1. Installation Setup

System Requirements

  • Operating System: Windows Server 2012, 2016, 2019, 2022
  • Hard Drive: 512 GB to 1 TB Fast drive recommended – ideally SSD.
  • CPU: Minimum of 4 cores, operating at 3 GHz or higher.
  • RAM: At least 8 GB.
  • Software:
  • IIS with the necessary Windows features should be installed as described below.
  • VGRepository
    • Require SQL Server 2012 or later, with a minimum of the Standard Edition.
    • Require Oracle Database with Oracle9i or later. Please ensure the Oracle Driver is installed.

  1. Install Internet Information Services (IIS): IIS is a web server software package designed for Windows. It’s used for hosting websites and other content on the web. You can install it through the “Turn Windows features on or off” menu in the Control Panel. The below screenshot shows which functions should be checked and vice verse.
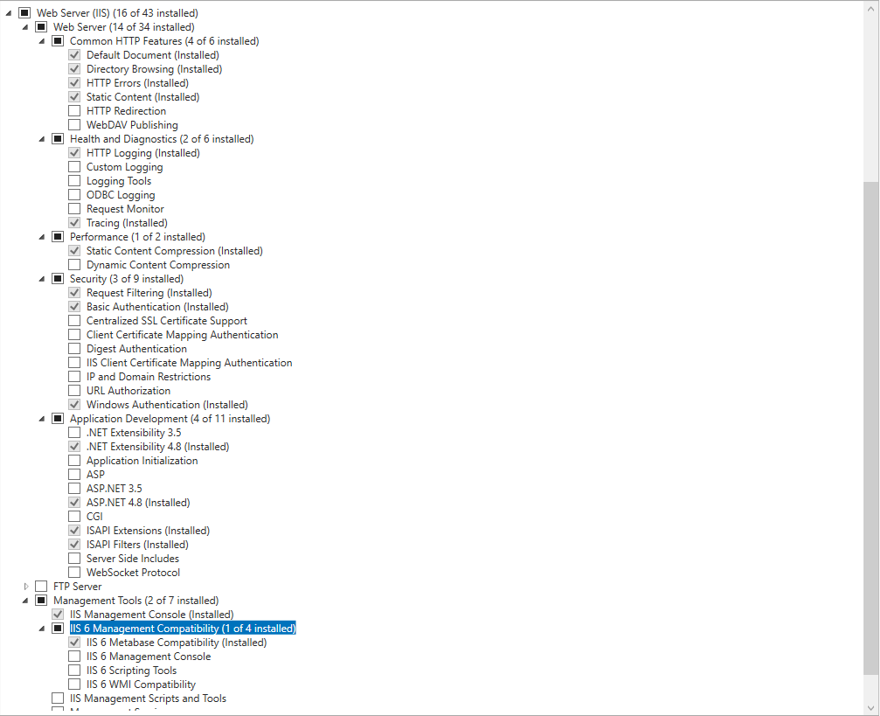
2. Download and Install .NET Core Hosting Bundle: The hosting bundle includes the .NET Core Runtime 6.0, .NET Core Library, and the ASP.NET Core Module. The ASP.NET Core Module is a necessary component for hosting ASP.NET Core applications on IIS. You can download the hosting bundle (dotnet-hosting-6.0) from the official Microsoft website. (https://dotnet.microsoft.com/en-us/download/dotnet/thank-you/runtime-aspnetcore-6.0.26-windows-hosting-bundle-installer)

3. Restart IIS: After installing the .NET Core Hosting Bundle, you should restart the IIS to ensure the changes take effect. You can do this by opening a command prompt as an administrator and running the command iisreset.

4. Verify the Installation: You can verify that .NET SDK and ASP.NET Core Runtime are correctly installed by opening a command prompt and running the following commands:

  • For ASP.NET Core Runtime: dotnet --list-runtimes

These commands should display the versions of ASP.NET Core Runtime that are installed on your machine.

5. Install Visual-Guard WebConsole: Once IIS, .NET Core SDK, and ASP.NET Core Runtime are installed, you can proceed with the installation of Visual-Guard WebConsole. Follow the instructions provided by Visual-Guard for this process.


Installation Guide

The Visual Guard WebConsole needs to be installed on your server. Follow these steps for a successful installation:

  1. License Agreement: Accept the license agreement to proceed with the installation.
  2. Installation Details: Provide the necessary information, including:
    • The site
    • The virtual directory
    • The application pool (“No Managed Code” as .NET CLR Version)
    Click ‘Next’ to continue with the installation.
  3. Confirmation: Confirm to initiate the installation of the console on your server.
  4. Installation Process: Please be patient while the installation process is underway.

Installation

  • Step 1: The Visual Guard WebConsole needs to be installed on your server. Follow these steps for a successful installation:

  • Step 2: License Agreement: Accept the license agreement to proceed with the installation.

  • Step 3: Installation Details: Provide the necessary information, including:
    • The site
    • The virtual directory
    • The application pool

Click ‘Next’ to continue with the installation.


  • Step 4: Confirmation: Confirm to initiate the installation of the console on your server.

  • Step 5: Installation Process: Please be patient while the installation process is underway.
  • Step 6: Installation Complete.

2. Create or select an existing repository

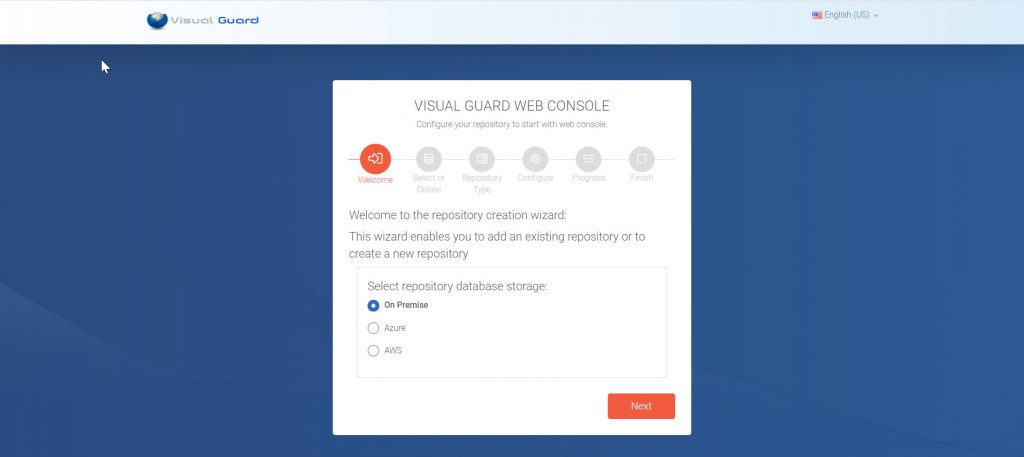
Select your environment and click on “Next”
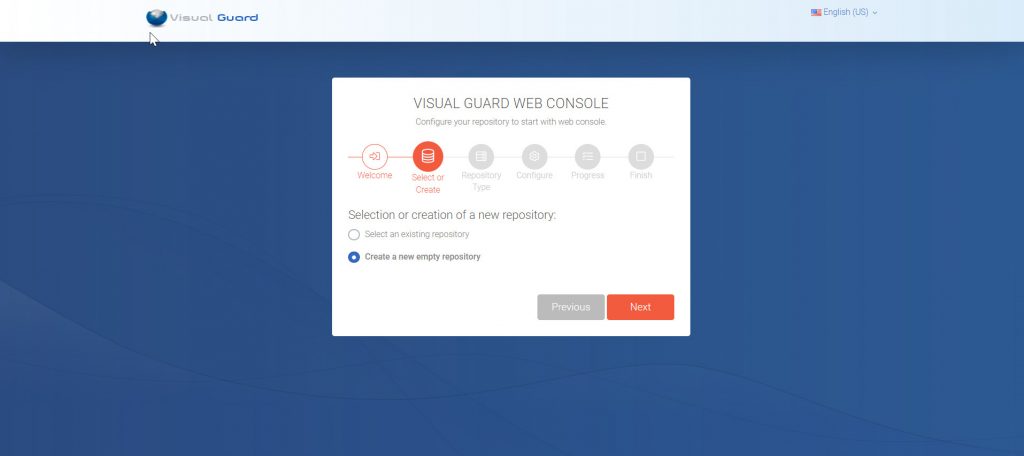
Select if you want to create a new VG Repository or Select an existing one
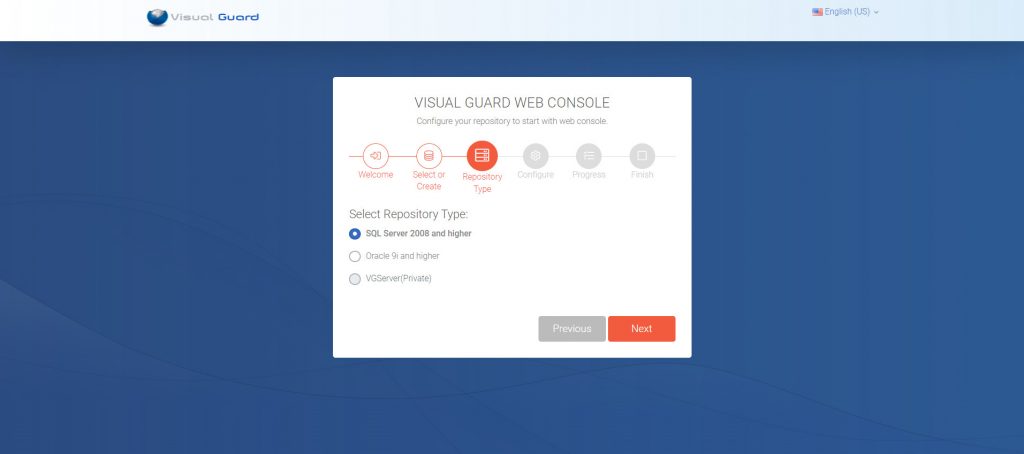
Select the type of VGStorage

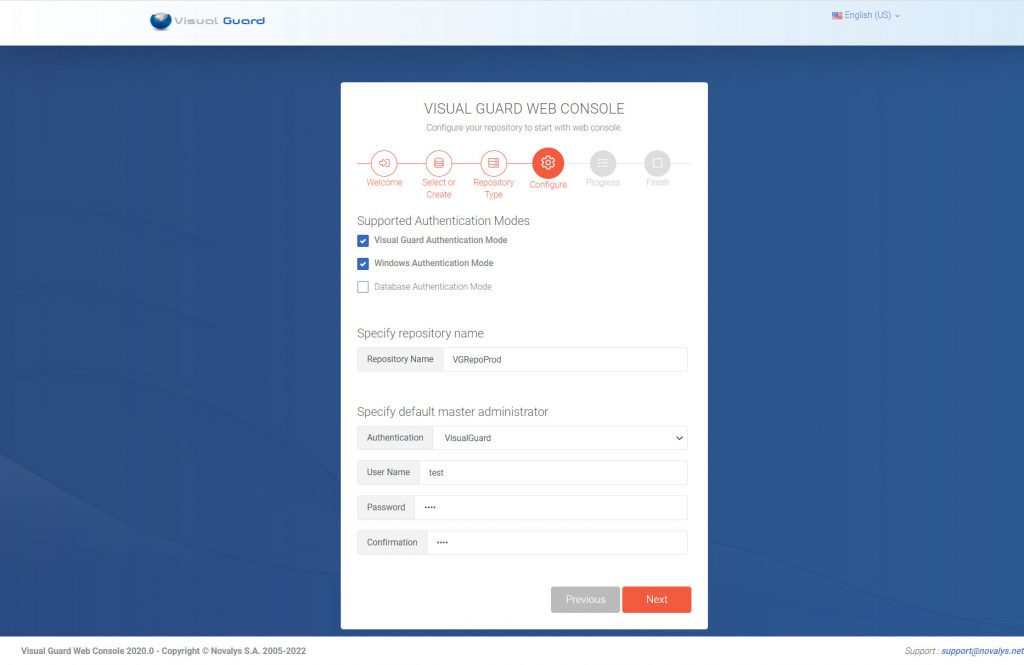
Create a new Repository

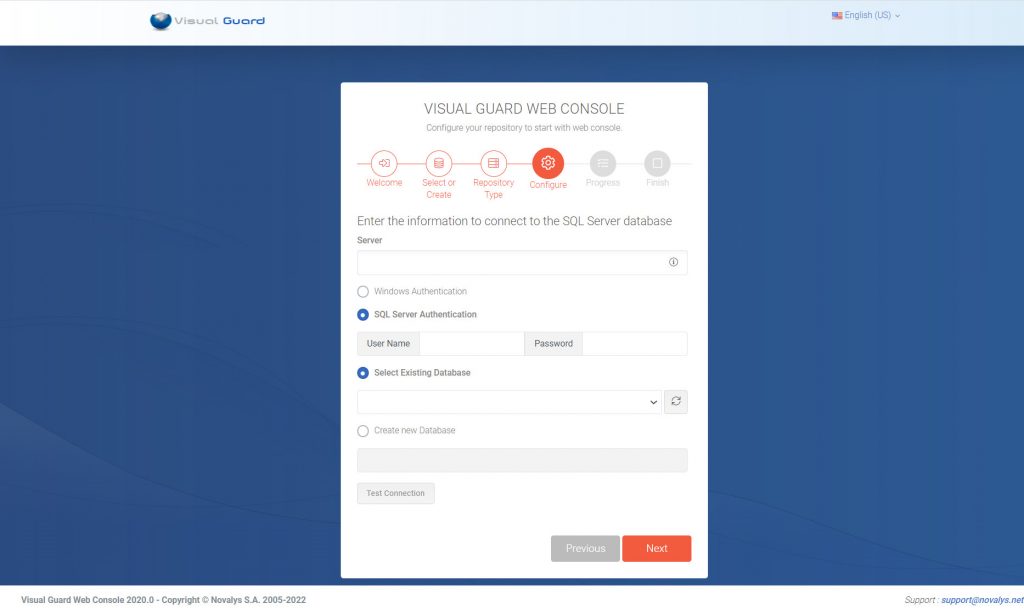
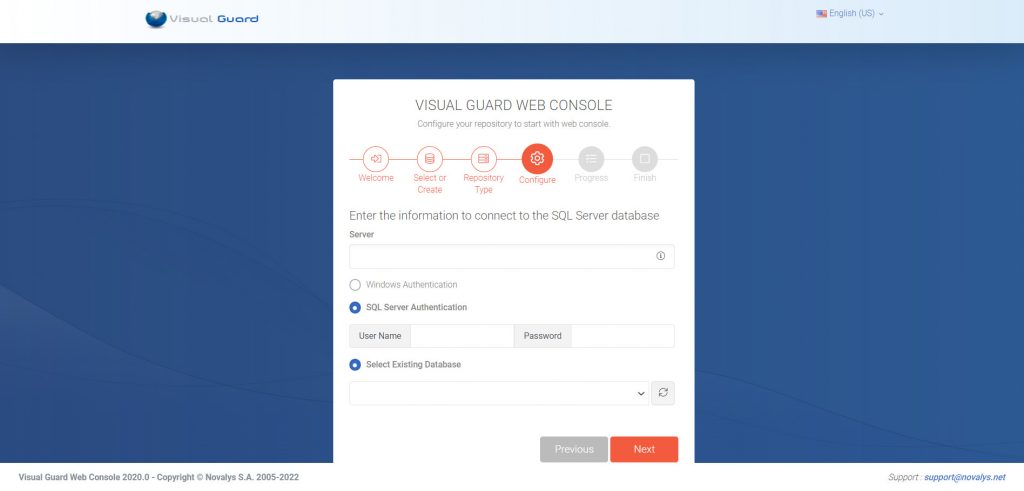
Enter the information to connect to the VGRepository
Select an existing repository
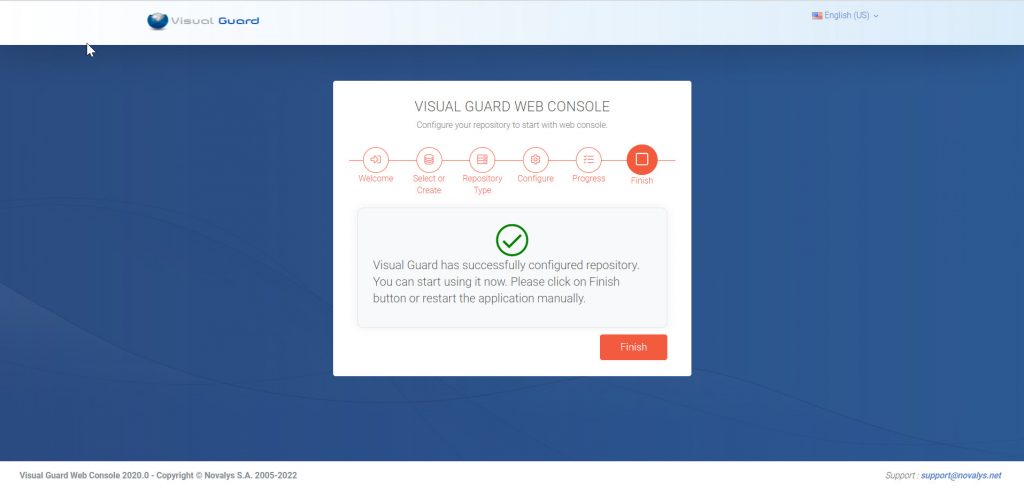
Click the “Finish” button

3. Login

The login page in Visual Guard WebConsole is the entry point for users to securely access the management interface. It requires users to enter their credentials and ensuring that only authorized personnel can manage and configure security settings and access controls within Visual Guard.


  • A summary of the console is written on the left of the page
  • On the right of the page, the login parameters are
    • Select your authentification type  
    • Enter your user name 
    • Then enter you password
  • Remember Me: This feature in Visual Guard WebConsole allows users to stay logged in for an extended period without needing to re-enter their credentials. When enabled, this feature uses cookies to remember the user’s session, providing a more convenient and seamless login experience while still maintaining security protocols.
  • You can choose the language of the website.

Authentication Types

  • VisualGuard
  • Windows
  • Passwordless
  • Database


3.1 VisualGuard

Users authenticate using Visual Guard’s built-in login system, where they provide a username and password combination verified against Visual Guard’s user database. This method offers a standard authentication approach managed within the Visual Guard framework.


Step 1: Choose VisualGuard from the drop down list under the authentication –> enter the User Name and Password –> Click Sign in


3.2 Windows

Users authenticate through their Windows credentials, leveraging the security infrastructure of the Windows operating system. Visual Guard integrates with Windows authentication to validate user identities, providing seamless access to applications based on Windows credentials.


Step 1: Choose Windows from the drop down list under the authentication –> enter the User Name and Password –> Click Sign in


3.3 Passwordless

Passwordless login is a method of authentication that allows users to access a system or application without requiring a traditional password. Instead of entering a password, users are authenticated through alternative methods such as magic link or SMS verification. In Visual Guard, passwordless login enhances security and user experience by providing convenient and secure authentication options that eliminate the need for users to remember and manage passwords.


Step 1: Choose Passwordless from the drop down list under the authentication –> enter the User Name –> Click Sign in


3.4 Database

Visual Guard webconsole allows users to authenticate using their database credentials. This method ensures secure access by verifying the user’s identity directly against the database, enhancing security and integrating seamlessly with existing database systems.


Step 1: Choose Database from the drop down list under the authentication –> enter the User Name and Password –> Click Sign in


4. Multifactor Authentication (MFA) Enrollment

Visual Guard supports Multi-Factor Authentication (MFA) on top of the existing authentication methods, requiring users to provide additional verification beyond a username and password. This could include receiving a one-time password (secure code) or magic link via SMS or email and TOTP via microsoft authenticator. MFA enhances security by adding an extra layer of protection against unauthorized access, even if login credentials are compromised.

Modes of Authentication

4.1 Via Email Address

OTP (One-Time Password) or a secure link sent via email is used as an additional layer of security to enhance the authentication process.This method significantly reduces the risk of unauthorized access and is especially useful for protecting sensitive operations and transactions.


Step 1: Select the email address option


Step 2: Enter your Email ID and select Send Email


Step 3: Enter the secure code you may have received over the registered email ID and click on Validate


Step 4: Once your identity is validated, you can return to the application home page. Upon attempting to log in, you will be presented with a screen that offers you the choice of receiving either a link or an OTP (One-Time Password) to your registered email ID for authentication. Select your preferred method and click “Continue” to complete the authentication process successfully.


4.2 Via Phone Number

In Visual Guard, the OTP/Link via phone number feature allows users to authenticate themselves through their registered mobile number. When attempting to log in, users can choose to receive an OTP (One-Time Password) or a verification link sent directly to their mobile phone via SMS. This added layer of security ensures that only users with access to the registered phone number can complete the authentication process.This method enhances security by leveraging a second factor of authentication tied to the user’s mobile device.


Step 1: Select the phone number option


Step 2: Enter your Phone Number and select Send SMS


Step 3: Enter the secure code you may have received over the registered phone number and click on Validate


Step 4: Once your identity is validated, you can return to the application home page. Upon attempting to log in, you will be presented with a screen that offers you the choice of receiving either a link or an OTP (One-Time Password) to your registered phone number for authentication. Select your preferred method and click “Continue” to complete the authentication process successfully.


4.3 Via Microsoft Authentication

In Visual Guard, TOTP (Time-based One-Time Password) via Microsoft Authenticator provides an additional layer of security for user authentication. Users can set up their Microsoft Authenticator app to generate time-based, one-time passwords that refresh every 30 seconds. During the login process, users enter the current TOTP displayed on their Microsoft Authenticator app to verify their identity. This method ensures a secure and dynamic form of authentication, as the OTP is time-sensitive and unique to each login attempt.


Step 1: Select the Microsoft TOTP authentication option


Step 2: Select the type of device you use.


Step 3: Scan the QR code to download the application.

Andriod device

IOS device (Iphone)


Step 4: Once you open the application and scan the QR code your profile account will be added automatically.


Step 5: Enter the secure code that is generated by the application and click on Validate


Step 6: You will get a notification for the successfull enrollment, click on Go back to Application to login further.


Step 7: Once you can return to the application home page. Upon attempting to log in, you have to click on the Microsoft Authenticator icon and enter the code and click on Continue to complete the authentication process successfully.


5. Getting Started

This is an introductory guide or set of instructions provided to users after they have created a new application. This guide typically assists users in setting up and configuring the application further to ensure that it meets their specific needs and requirements. It may include step-by-step instructions, or tips on how to customize the application’s settings, add users, define roles and permissions, and perform any initial setup tasks necessary to get the application up and running smoothly. The goal of the “Getting started” guide is to help users quickly familiarize themselves with the application and its features, enabling them to start using it effectively as soon as possible.


Section 1: Create your first application

  • Declare your application: Initiate the creation process for your application within the Visual Guard system, specifying its name, description, and other relevant attributes
  • Create your first role: Define a new role within the application, assigning it a name, description, and any necessary attributes, to represent a specific set of permissions or responsibilities for users
  • Create your first permission: Establish a new permission or access control rule within the application, specifying the resource or functionality it governs, along with any associated conditions or constraints
  • Assign Permission to Role: Associate the newly created permission with the role previously defined, granting users assigned to that role the corresponding access rights or privileges within the application

Section 2: Use Visual Guard with your current application

  • Create a new secure channel communication (VGIdentityServer): Implement a secure communication channel for Visual Guard’s Identity Server component to ensure encrypted data transmission and protection against unauthorized access
  • How to integrate Visual Guard in your application: Follow integration guidelines and procedures provided by Visual Guard to seamlessly incorporate its authentication and authorization features into your application, ensuring secure access control and user management functionalities
  • Test Authentication: Verify the authentication process by conducting comprehensive testing procedures, including login attempts with valid and invalid credentials, verification of access permissions based on user roles, and examination of error handling mechanisms to ensure robust security and functionality

Section 3: How to use Visual Guard

  • How to create a Visual Guard User?: Adding a new user in Visual Guard by providing necessary details such as username, email, and password.
  • How to grant a role to a user?: Assigning a specific role to a user in Visual Guard to allocate corresponding permissions and access rights.
  • How to audit the user?: Monitor and track user activities in Visual Guard for compliance, security, and accountability through comprehensive logging and reporting.
  • How to Monitor the user?: Monitoring users involves tracking their activities within a system to ensure security, compliance, and performance, typically through logging, auditing, and analytics.

6. Dashboard

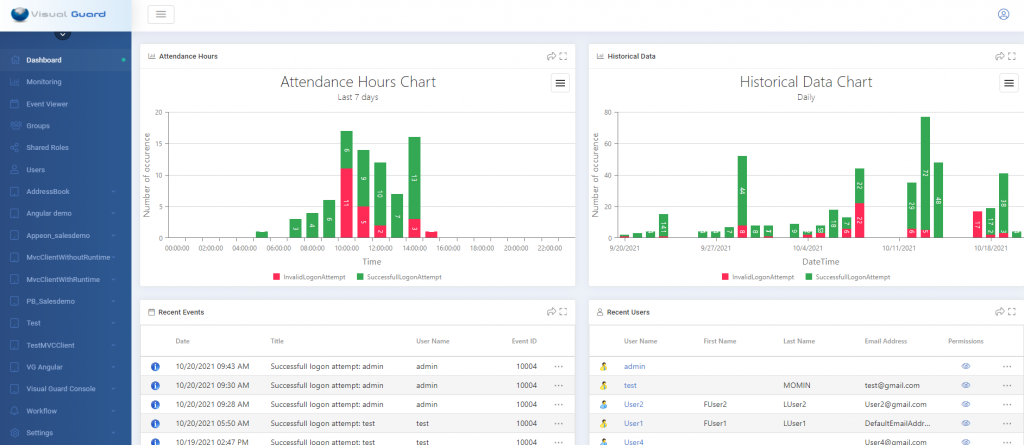
The Dashboard of the Visual Guard WebConsole is the Homepage of the website.

It present itself this way:

There are five main elements on this page: 

  • The general menu on the left panel : All the sections are listed
  • Monitoring : This page explains the details of the websites and list all the registered attendances and events of the users 
  • Event Viewer: This page list all the events that has occurred on the websites with the following dates and the users doing the actions: the using of an application, an attempt of login that has been successful /unsuccessful. 
  • Groups: All the users groups are listed with their details. A search bar and a menu is displayed with all the actions available on the groups. 
  • Shared Roles: All the shared roles are listed with their details. A search bar and is displayed with all the actions available on the roles. 
  • Users: All the Users are listed with their details. A search bar and is displayed with all the actions available on the users. 
  • Applications: All the applications are displayed in the general menu. 
  • Workflow 
  • Settings

Attendance Hours Chart

  • The Attendance Hours chart : this is divided in to part: In read Invalide Log on Attempt and in green Success Full log on Attempt. This is the number of logins in the last 7 days. 
  • By clicking on the small curved arrow on the top, it leads on the corresponding monitoring page 
  • By clicking on the small square, the page will open in full screen. 

Historical Data Chart

  • The Historical data chart: this is divided in to part: In read Invalide Log on Attempt and in green Success Full log on Attempt. This is the number of occurence in date time. 
  • By clicking on the small curved arrow on the top, it leads on the corresponding monitoring page 
  • By clicking on the small square, the page will open in full screen. 

By clicking on this icon, the printing menu shows as below: 

  • Print
    • PNG file
    • JPEG file
    • PDF file 
    • SVG file

Recent Events

  • The list of Recent Events: this list resume the number of login attempts and by who. 
  • By clinking on the “…” , the data details will open as shown below. 
    • By clicking on the blue informations “I” on the left, the users details will open as below: 

Recent Users

  • The list of Recent Users : this list resume the recent connected users on the visual guard web console. 
  • You can audit the permissions of the users bu-y clicking on the eye icon. 
  • The blue person icon stands for the persons who do not have the right to be connected on the VG administration console. 
  • The yellow person icon stands for the persons who have the right to be connected on the VG administration console. 

7. Monitoring

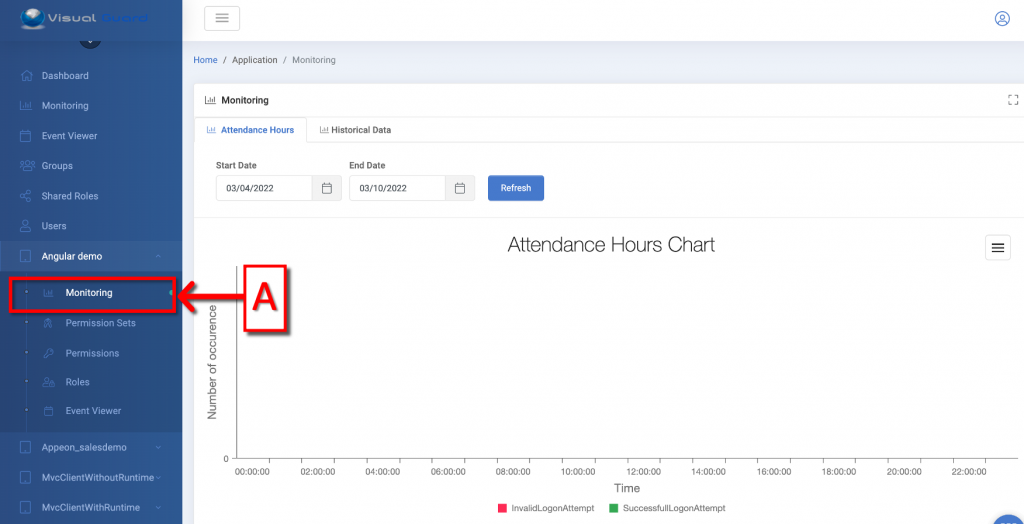
This feature allows to monitor occurrences of important events for specified time intervals for whole repository in user friendly graphical format, follow the steps below:

  • Log in to the Repository.
  • Click on the Repository Name to view the Monitoring Details.
  • Select the Monitoring Tab (A).

Know more on different patterns of Monitoring:

7.1 Attendance Hours Chart

The monitoring section of Visual Guard webconsole is a group of pages of informations and datas about the affluence on the websites and historical and workflows datas.

Note: This page shows the numbers of occurences of logon attemps. 

  • This is divided in two parts: In read Invalide Log on Attempt and in green Success Full log on Attempt. This is the number of logins in the chosen time line.  
  • You can select the date by clicking on start and end date as shown below:
  • You can select which applications you want to audit by clicking on applications. 

See also: 

7.2 Historical Data Chart

The monitoring section of Visual Guard webconsole is a group of pages of informations and datas about the affluence on the websites and historical and workflows datas.

Note: This page shows the historical data chart

  • This is divided in to part: In read Invalide Log on Attempt and in green Success Full log on Attempt. This is the number of occurence in date time. 
  • By clicking on the small square on the left corner, the page will open in full screen. 

Select the applications wanted to be audited by clicking on applications. 

Pick the chart legend by clicking on the “v”, this menu will open:

  • Select the chart type by clicking on the data wanted as shown below: 

See also: 

7.3 Worklow Data

The monitoring section of Visual Guard webconsole is a group of pages of informations and datas about the affluence on the websites and historical and workflows datas.

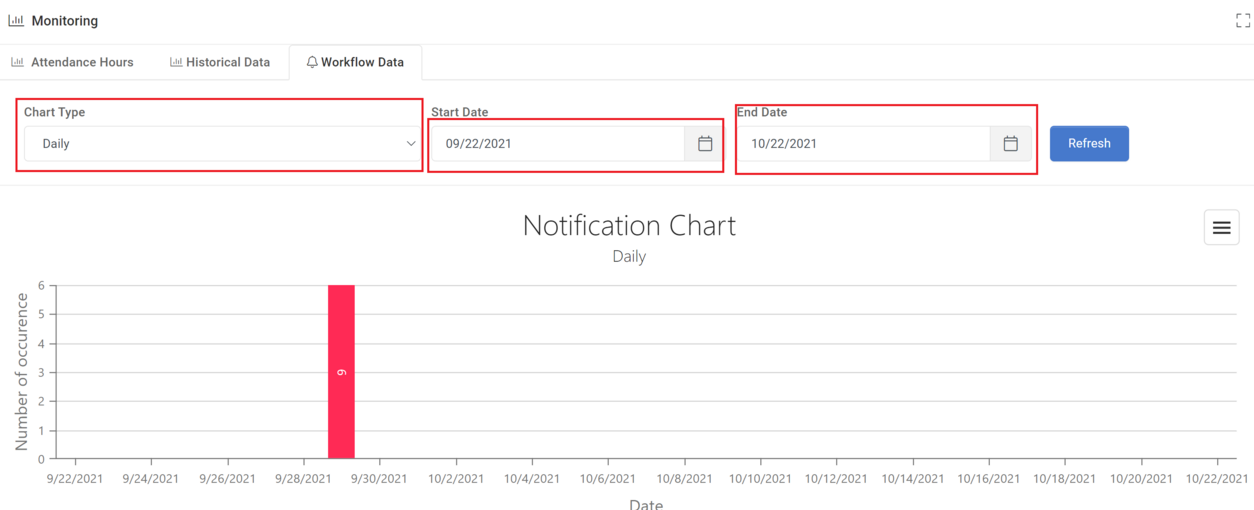
Note: This page shows the number of notifications that happened in the chosen time period. 

  • This is divided in two part: the date and number of occurences
  • The time period can be chosen as shown below, enter the starting date and the ending date in a chronological order. 


  • The chart type can also be chosen between: Hourly, Daily and Monthly. 

See also: 

8. Event viewer

The Visual Guard Webconsole allows you to audit all the event happening on the console.

  • Go to the “Event viewer” page on the left navigation panel 
  • This page will show: 
  • All the events are listed with the date, the title (the actions), the user name that did the event, the event ID and the device. 
  • You can choose the application by clicking on the rolling list under it and choose between all the applications:
  • To filter the event you can also define a starting date and an ending date. 
  • You can also filter the type of event by clicking on the rolling list under “Filter type”:
  • To search after selecting the filters, click on search and the corresponding list will appear on the screen. 

9. Groups

The Groups are a globality of roles/ users or permissions. Many actions can be done on these groups via the main page. 

See also: 

9.1 Dashboard

Visual Guard now allows you to create group of user accounts.

A user group may contain:

  • VG user accounts
  • VG Groups
  • Windows user account
  • Windows Groups

Main features:

  • Create/Read/Update/Delete groups through VG WinConsole, VG WebConsole and VG API.
  • Hierarchical organization: Groups can contain users or sub-groups in it
  • Group Permission Management: Roles can be related to any level of groups and will apply to all the users and sub-groups within this group.
  • Hierarchical Administration rights: When the VG Administrator Role belongs to a group, their administration privileges are automatically restricted to the users and sub groups of that group.

Using Visual Guard you can perform following actions:

Please Note: This page explains how to use the dashboard of the Groups section.

Dashboard informations

  • The dashboard allows you to see informations and to perform certains actions.
  • The date of the last modification is shown
  • The description is available from the dashboard
  • To select a Group, click the check box next to it
  • To show all the proprieties of the group, click on it

From the action menu on the right corner you can : 

The hierarchy

  • The dashboard shows the condense versions of the Groups as shown below: 
  • To open the hierarchy and see the subgroups, click on the arrow in front of the selection box of the group.
  • They will open this way: 
  • you can also see the hierarchy by clicking on the hierarchy icon on the left
  • This page will open
  • To search different type of group, go in the rolling bar under Manage Groups and chose the type of Group desire.
  • Next, click on search and the results will show on the main page. 

Create a Group

  • You can also create group by clicking on “+ Add Group”
  • This page will open
  • Enter the Group name in “Group Name”
  • Chose the parent Group in the following rolling list
  • Click on “ok” to create the Group

OR

  • Click on “cancel” to cancel the creation of a Group

9.2 Search and Select Groups

Visual Guard allows you to filter the list of groups and select single/multiple groups.

Filter the list of Groups

  • To filter the list of groups you are provided with the selection of the search criteria (A). You can click on the drop down and select the search criterion.
  • As soon as you select the search criteria in the drop down (A), a Text Box/Drop Down appears (B) to enter value or select the value by which you want to search the record.

For example: In case you select Country Attribute as search criteria, then you will have to mention group name in the textbox.

  • Click on “search” after entering/selecting the value by which record is to be searched. The list of users matching the search criteria will be visible in the below grid.
  • You can filter the events using various filter options.
FieldDescription
Filter Options:This section explains about the filter option details. These are the filter options available in the drop down (A)
All GroupsSelect this option if you want to see the list of all the groups and click on
Group NameSelect this option if you want to search for the group by its Group Name.
 As soon as you select this option, an Edit Box appears. Enter the Group Name in this field by which you want to search.
Child GroupsSelect this option is you want to search for the sub groups which belong to particular Group.
 As soon as you select this option, a Drop Down appears with complete tree structure of the Group.
 Select the Group and system will search for the immediate children belonging to the selected Group.
Child Group and
their subgroups
Select this option is you want to search for the group which belong to particular Group including its Sub/Child Groups.
 As soon as you select this option, a Drop Down appears with complete tree structure of the Group.
 Select the Group and system will search for the groups belonging to the selected Group including its all Sub/Child Groups.

Select/De-select a Group

Select Group(s)

  • You can select either single/multiple groups by selecting check box besides the name of the groups (A).
  • You can also see the list of only selected groups by clicking on “Show Selected Count” link (C).

  • As soon as you click on the “Show Selected Count” link, one more grid appears (D) showing the list of Selected Groups from all the pages.

De-select Groups

  • To de-select a group you can either de-select the check box besides the group (A) or you can click on the stop sign icon in Grid (D).
  • If you want to de-select all the selected users then click on the checkbox next to “Name”.

Assign users to groups

  • Select the groups for which you wish to assign users. Click on “Assign Users to Groups” and then select the users you want to assign displayed in the below window.

  • After selecting the users “Assign Users to Groups” gets enabled. Clicking on the button will assign users to selected group(s).

Edit role

One can grant or revoke roles to the selected groups by clicking on “Grant Role” or “Revoke Role” . To know more click here !

Note: While granting a role to groups, if Is Role Propagated to Descendant Groups is set as Yes then the child groups will be assigned all the roles else No as displayed in the screen below.

Refresh Page

  • You can filter the list of groups by clicking on “Refresh” . This will update the group list with updated data.

9.3 Create Groups

The Visual Guard user Groups can contain subgroups.

You can grant N roles and N users to a group. Any user or sub-group inside the group may also have the granted role as well.

Visual Guard Group can contain Windows users or Windows groups.

Groups

In order to create a group follow the steps below:

  • Login to the Repository where you want to create a group.
  • Access the Add Group option, using one of the options mentioned below:
    • Right click on the Groups from the Left Navigation Panel and select the Add Group option (A) from the Left of the searching tool bar.
  • The new group will be created under the Groups option as shown below:
  • You can rename the group by selecting the group and pressing F2 key (B). For example Dept 2 (sales)
  • The renamed group will be displayed as shown below:

Subgroups

You can also create the sub groups under a parent group.

Subgroups inherit parent group roles.

Follow the steps below to create a sub group.

  • Login to the VG Webconsole and select the Groups> Group Name under which the subgroup needs to be created.
  • Access the Add Group option using one of the options below:
    • Right click on the Groups> Group Name from the Left Navigation Panel and select the Add Group option (A) from the popup menu
  • You can rename the group by double clicking on the group name (B). You can rename the new group. For example Dept 2 (Sales) The renamed group will be displayed as shown below:

See Also:

9.4 Edit group

Visual Guard allows you to modify the Groups Details and manage the assigned roles and users of the Group

Follow the steps below to modify a Visual Guard Groups:

  • Login to the Repository under which Group is to be modified.
  • Click on “v” icon of Groups option available in Left Panel. List of Groups created under the selected repository will be visible (A)
  • Select the Group from left panel which is to be modified.
  • The details of Group will be displayed in right panel (B) as shown below.

See Also:

9.4.1 Edit Group Propreties

Visual Guard allows you to modify Group’s Properties. 

To modify group details follow the steps below:

  • Select the Groups from the Left Navigation Panel.
  • Click on the Group Name to modify the Group.
  •  The Properties Tab (A) is selected by default
  • Following options will be available to you.
FieldDescription
Group IDThis is the unique id of the group.
DescriptionThis option allows you to enter the selected group’s description.
Data 1,2,3These options allows you to enter the custom data
  • Modify the details and click “Save” to save the details.
  • The updated details will be displayed next to the group name.

See Also:

9.4.2 Edit the Roles Granted to a Group

Visual Guard allows you to create groups and manage roles assigned to the group. 

To view group details follow the steps below:

  • Select the Groups from the Left Navigation Panel.
  • Click on the Group Name to view the Group Properties.
  • Select the Roles Tab (A).
  • The roles inherited from the parent group will be highlighted.
  • Following options will be available to you:
FieldDescription
NameThis option displays the name of the role
DescriptionThis option displays the role’s description
View PermissionsThis option displays the permissions of the Role
Propogated to descendantThis option displays whether the selected role is propagated from the parent group or has been assigned to the group directly.

The option can have one of the values below:

Yes: The value implies that the role has been propagated from the parent group to the child groups

No: This value implies that the role cannot be propagated from the parent group to the child group

Please Note: In case a role has been assigned to the parent group and also to sub group then propagated to the descendant will be set to False.
  • You can modify the group roles using one of the options below:
    • Select the Edit Roles option from the Action Menu.

OR

    • Click on “Edit Roles” provided at the bottom of the Right Navigation Panel .
  • Select the role that needs to be granted from list of roles (A).
  • User can grant one role at a time. Once a role (A) is selected ” -> Grant” (B) will be enabled. 
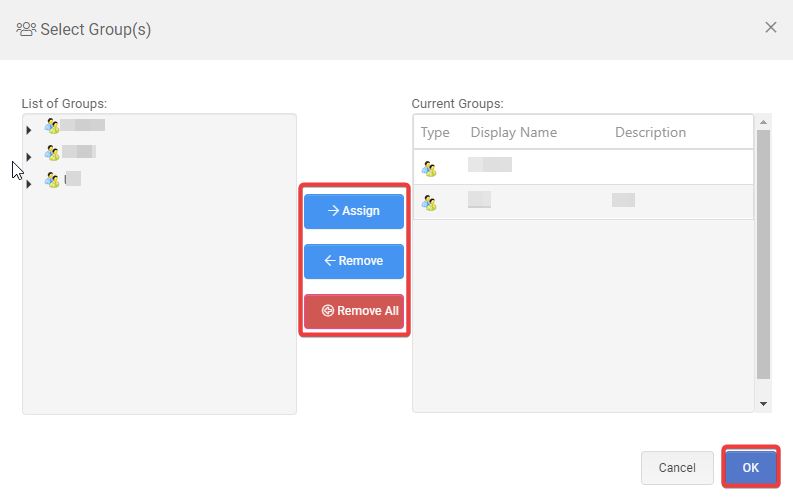
  • Click on “-> Grant” , the granted role will be displayed in Current role section (C).
  • User can remove the role by selecting the role from Current roles list.
  • Click on  “<- Revoke” to remove the role. The removed role will again be available in List of roles (D).
  • Click on “OK” to save the roles or click on “Cancel” to discard the changes.
  • Once user saves the details, the list of Current roles will be updated.

See Also:

9.4.3 Assign / Remove an user

Visual Guard allows you to create groups and manage users assigned to the group.

To view and edit the list of users that have been assigned the selected group follow the steps below:

  • Select the Groups from the Left Navigation Panel.
  • Click on the Group Name to view the Group details.
  • The Properties tab will be displayed by default. Select the Users Tab (A).

  • The list of all users to whom the group has been currently assigned will be available to you.

Note :

  • Using above screen, you can only view the list of the users assigned to the Group.
  • You can click on the name of the user to Modify the User Details. You will not be able to Modify the “Groups” of the user from this “Edit User Details” Screen. Click here to know more about assigning groups to the User

ASSIGN USERS TO GROUP

  • To assign more users to the selected Group, click on “Assign users to Groups”. You will be provided with below screen:

  • Select User(s). “Assign users to group” option will be activated. Click on  “Assign users to Group” to assign selected users to the Group.

REMOVE USERS FROM GROUP

  • Select User. Click here to know more about Selecting User

  • As soon as the user is selected, “Remove users from group”  will be activated.

Note : The screen allows you to remove the users to whom this group has been assigned. As soon as the user is removed from the group the roles associated with the group will be revoked.

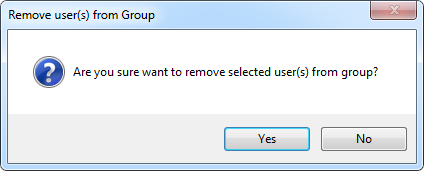
  • As soon as you click on “Remove users from Group” , you will be asked for the confirmation.

  • Click on “yes” to save the users or click on  “No” to discard the action.
  • The assignment between the Group and the selected users will be removed.

See Also:

9.5 Audit Permissions

Visual Guard allows to grant an infinite number of permissions for different types of entities: users, groups or roles.

  • This page explains how to investigate the permissions granted to a certain role.
  • Click on the “Eye Icon” on the right of the Group to see its permissions.(A)

OR

  • Click on Edit Group Details > Audit Permissions (B). 
  • The permissions are listed according to the selected entity, grouped by application.
  • This helps to review all the permissions granted to this entity
  • When clicking on an application, the permissions granted for this application are listed (B).

9.6 Rename a Group

To rename a group, follow the steps below:

  • Select Groups from the Left Navigation Panel.
  • The details of the selected group will be displayed.
  • You can access the Rename option using one of the options mentioned below:
    • Click on the Group you want to rename (A), select the Name option from the menu. (B)
    • Then click on update and the wanted group will be rename in the menu (C).

See Also:

9.7 Remove a Group

To remove the group, follow the steps below:

Note: The system does not allow you to remove a group that has sub group(s) associated with it.

  • Select the Groups from the Left Navigation Panel.
  • Select the Group that is going to be removed by clicking on the check box next to it. (A).
  • Select the Remove option from the Group Action button on the rights of the tool bar (B).
  • Click on “OK” to remove the Group or click on Cancel to discard the action. 
  • The Action will be updated immediately.

See Also:

10. Users

The user page is the page regrouping all the users of the Visual Guard  Webconsole and the details about their permissions and roles. 

See also: 

10.1 Visual Guard User

Visual Guard has its own membership provider to manage user accounts and passwords.

The credentials are stored in the Visual Guard repository.

You can restrict the access to Visual Guard or any other application integrated with it using Roles and Permissions. Click here for more information on Roles.

Visual Guard allows you to perform following actions

10.1.1 Create a Visual Guard User

Visual Guard allows you to create new Visual Guard user accounts.

Note: You will be allowed to create the user accounts only if you have been assigned the privilege. Refer special roles section for more details on privilege

Follow the steps below to create a Visual Guard User:

  • Login to the Repository under which user account(s) is to be created.
  • Access the New Visual Guard User menu using the option below:
  • Right click on the Users menu provided on the Left Navigation Panel and select ” +Add user”
  • Then click on “+ New Visual Guard User” (A).
  • To create new user account you have to provide following details:
Field nameDescription
UsernameEnter a unique user name.
This name will allow the user to login to the repository and access the application.
Email addressEnter Email address.
The Email address will be mandatory if the repository is configured to require unique email address for each user.
New passwordEnter the new password.
The password will be displayed in encrypted form.
ConfirmationReenter the password.
The password specified here should match the password specified in “New password” field.
User must change password at next logonSelect this option if you want to allow user to change his password for his next logon.
By default, this value is deselected.
Password QuestionEnter the password question.
This field will be mandatory if the repository is configured to require a password question and answer for each user.
Password AnswerEnter the password answer.
This field will be mandatory if the repository is configured to require a password question and answer for each user.

Role Assignment: 

This section displays the list of available and assigned roles. You can grant or revoke the roles using this section. 

List of RolesThis section displays the list of available roles
Current RolesThis section displays the list of roles that have been already assigned to the new user.
Display ‘Membership’ rolesThis option allows user to displays the membership access level to membership API for the application.
The user can be assigned Unrestricted, Membership Members Only only or Add Members role only.
  • For example to create user Johnson specify details as displayed below:

After specifying above details click “Create” to Save the user details.

Click “Cancel” if you do not want to create the user.

The new user account (A) will be displayed in the Grid on Right side. 

See Also:

10.1.2 Edit a Visual Guard User

Visual Guard allows you to modify the existing user accounts.

Note: You will be allowed to modify the details only if you have been assigned the privilege. Refer special roles section for more details on privilege.

To edit the Visual Guard user details perform the following steps:

  • Select Users from the Left Navigation Panel. All the users will be displayed in the Grid in Right Panel.
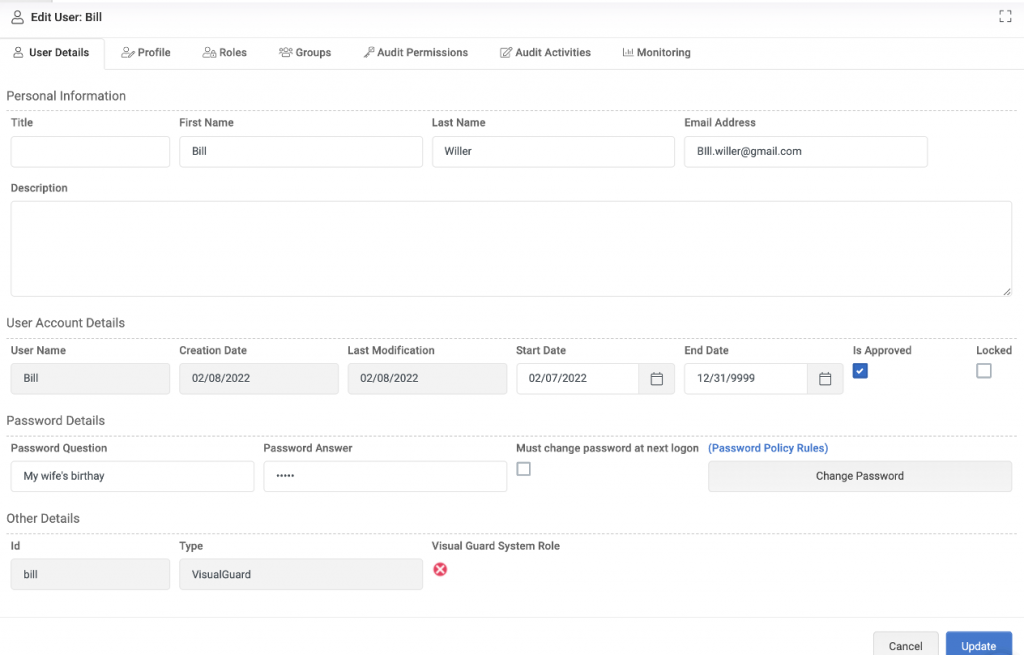
  • Click on the name of the user displayed in the Grid. “Edit User Details” Screen will open, as shown below. 
  • You can modify following user details using this module.
FieldDescription
Personal Information
TitleThis option displays the Title / Prefix used for the user. Enter the text in the edit box to modify the Title.
First NameThis option displays the First name of the user. Enter the text in the edit box to modify the First Name.
Last NameThis option displays the Last name of the user. Enter the text in the edit box to modify the Last Name.
Email AddressThis option displays the email address of the user. Enter the text in the edit box to modify the Email Address.
DescriptionThis option displays a short description related to the user. Enter the text in the edit box to modify the Description.
User Account Details
User NameThis option displays the Name of the user. You will not be able to modify this value.
PasswordThis option displays the current password of the user. Select the password to modify the password of the user.
To modify the password, click on “Change Password”. Below screen will be visible to you.

Enter New Password and re-enter your new password. Click on “OK” to modify the password or click on “Cancel” to discard the action.

See more here
Creation DateThis option displays the date on which the user account was created. You will not be able to modify this value.
Last Modification DateThis option displays the date on which the user account was last modified. You will not be able to modify this value.
Start DateThis date displays the date since when the user account will be activated.
Click on the calendar icon, calendar will be visible for you to select date
End DateThis date displays the date until when the user account will be active. To Modify the end date, follow the steps as explained in above for “Start Date”.
ApprovedIf this option is selected then it indicates that the user account has been approved to be authenticated in the selected repository.
Select/De-select the option to Approve or UnApprove the account of the user.
Locked OutIf this option is selected then it indicates that the user account has been locked and cannot access the system. Lock out also occurs when the number of Invalid password logins reach its predefined limit.
Select/De-select this option to Lock-Out/Un-Lock the account of the user.

Note: if the account of the user is locked out because of number of Invalid password attempt is exceeded, then only the master admin can modify this option else it will be disabled for any kind of modification.
Password Details
Password Question and AnswerThis option displays the Password Question and Answer.
The answer is displayed in encrypted form. The question and answer are used to retrieve the forgotten password.
Enter the Password Question and Answer to modify the Password Question and Answer of the user.
Must change password at next logonThis option displays whether the user needs to change his password on next logon. If this option is selected then it indicates that user will have to update his password on next logon.
Other Details :All options in this section cannot be modified
User IdThis option displays the unique identifier assigned to the user. The User Id is used for logon process.
User TypeThis option displays the user type For example Visual Guard User in current scenario
Visual Guard System AdministratorThis option displays whether the user has been assigned a role of admin or not.

See Also

10.2 Windows User or Group

Visual Guard supports Windows authentication. If you use the Windows authentication mechanism, passwords are created, stored, and administrated in Active Directory.

Visual Guard enables to search for a user in Active Directory. When the user is found, Visual Guard stores his security identifier (SID) in the repository.

You can restrict the access to Visual Guard or any other application integrated with it using Roles and Permissions. Click here for more information on Roles.

Visual Guard allows you to perform following actions:

10.2.1 Create a windows User

Visual Guard allows you to add Windows user accounts.

Note:

  • You will be allowed to access the user accounts only if you have been assigned the privilege. Refer special roles section for more details on privilege

Follow the steps below to create a Windows User:

  • Login to the Repository under which user account(s) is to be created. 
  • Select the Add Windows User or Group menu using one of the options below:
  • Right click on Users menu provided on the Left Navigation Panel and select “+ Add Users”
  • Then click on “Add Windows User or Group” (A)

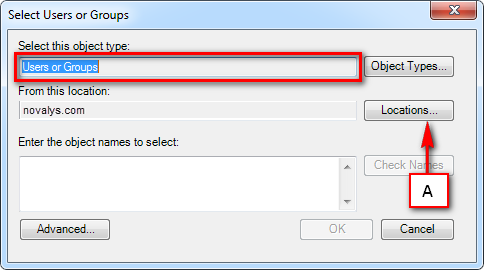
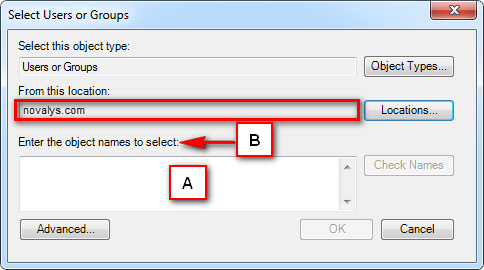
  • Click “User” or/ and “Group” to select the Object Type. Object Types screen will be displayed (A).
    • You can select all or any one of the options available in the screen.

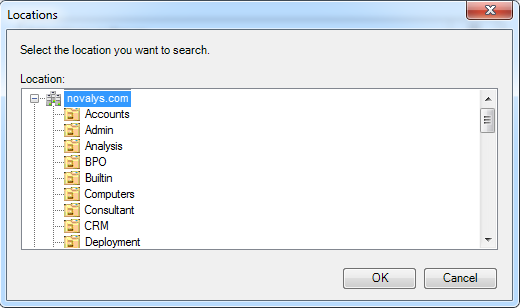
  • Select the location where the object type is located by clicking “Locations…”  (B). Locations screen will be displayed as below:
  • The list of all Domains, Sub Domains, and Groups etc available on your network will be displayed.
  • Accept the selection by clicking “OK” . The selected location will be displayed in ‘From this location’ field on Select Users or Groups screen.
  • Click “Cancel” to discard the selection
  • Enter the object name in ‘Enter the object name to select’ field (A). You can view examples of allowed object names by clicking on examples link (B).
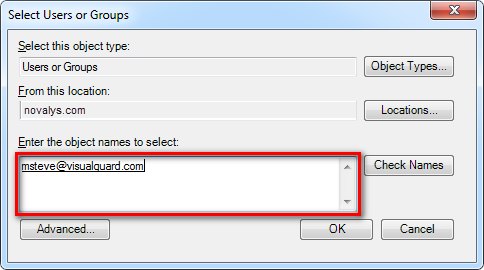
  • You can also search for object names by clicking “Check name”. The system will allow searching name in the selected location.
  • The name of the selected user will be listed as shown below
  • You can click “Advanced…” to perform advanced search.
  • Click “OK” to select the selected user. You can discard the selection by clicking “Cancel”.

Note: “OK” and “Check names” will only be active if any name has been specified in the ‘Enter the object name to select’ field.

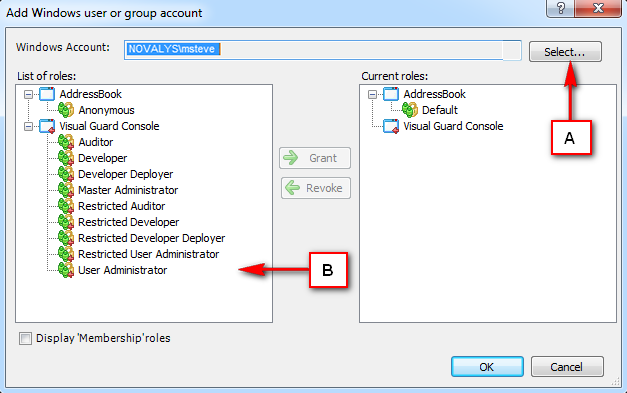
  • Once the selection is complete, the system will allow you to grant roles for the selected repository. 
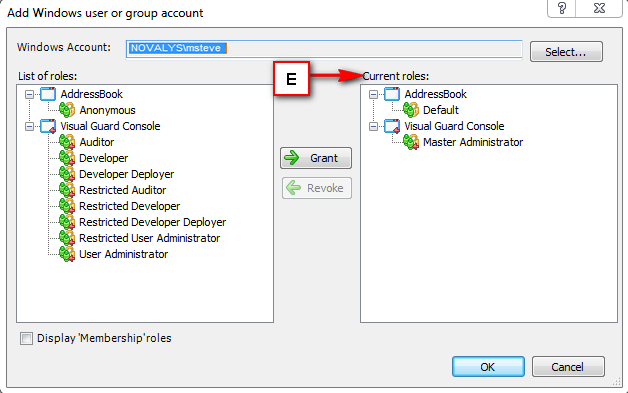
  • The selected object name will be displayed; you can alter the name by clicking “Select…” (A).
  • The list of roles available for allocation will be displayed in the List of Roles section (B).
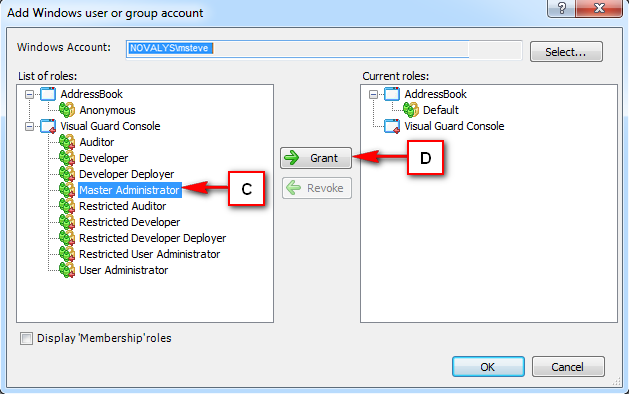
  • You can grant one role at a time. When role (C) is selected, “-> Grant” (D) will be enabled.
  • Click “-> Grant” , the granted role will be displayed in Current role section (E).
  • You can remove the role by selecting the role from Current roles list.
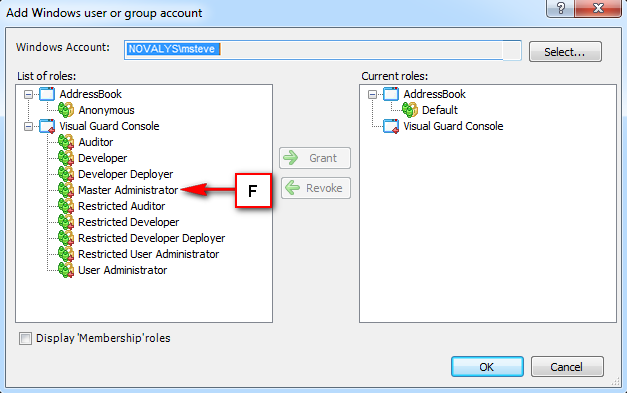
  • Click “<- Revoke” to remove the role. The removed role will again be available in List of roles (F).
  • Click “OK” to save the roles and user type or click “Cancel” to discard the changes.
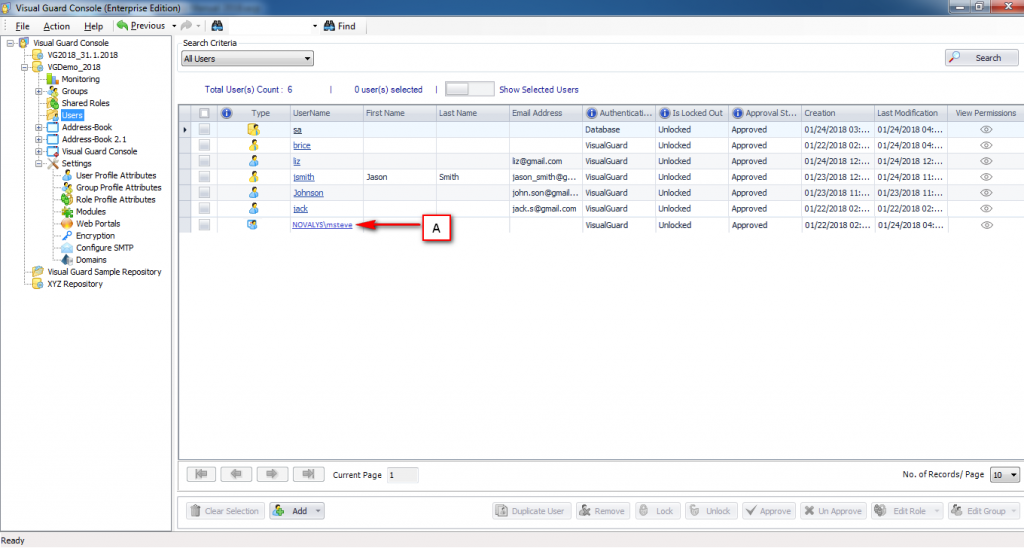
  • The new user account (A) will be displayed in the Grid on Right side.
  • The Windows user, when created are displayed with a separate icon i.e. and if a role is been assigned to these users apart from default role then the icon will be.

See Also : 

10.2.2 Edit a Windows User

Visual Guard allows you to modify the existing user accounts.

Note:

  • You will be allowed to modify the details only if you have been assigned the privilege. Refer special roles section for more details on privilege.

To edit the Window user details perform the following steps:

  • Select Repository > Users from the Left Navigation Panel. All the users will be displayed in the Grid in Right Panel.
  • Click on the name of the user displayed in the Grid. “Edit User Details” Screen will open.
  • You can modify following user details using this module
FieldDescription
User account details
User nameThe Username displays the name used for logon process. This name will be retrieved from the User accounts and is not managed by Visual Guard. Hence you will be unable to modify it.
Other Details
User IdThis option displays the unique identifier assigned to the user. This field cannot be modified
User TypeThis option displays the user type for example Window User in current scenario
Visual Guard AdministratorThis option displays whether the user has been assigned a role of admin or not.

10.3 Database User

Visual Guard supports authentication based on DBMS account for Oracle 8 and higher and SQL Server 2000 and higher.

Visual Guard allows you to re-use user accounts and passwords defined in these DBMS. The credentials are stored in the SQL/ Oracle repository.

You can restrict the access to Visual Guard or any other application integrated with it using Roles and Permissions. Click here for more information on Roles.

Visual Guard allows you to perform following actions

10.3.1 Create a Database User

Visual Guard allows you to re-use user accounts and passwords defined in these DBMS.

Note:

  • You will be allowed to create the user accounts only if you have been assigned the privilege. Refer special roles section for more details on privilege
  • This option will be available only for SQL or Oracle repositories only.

Follow the steps below to create a Database User:

  • Login to the Repository under which user account(s) is to be created.
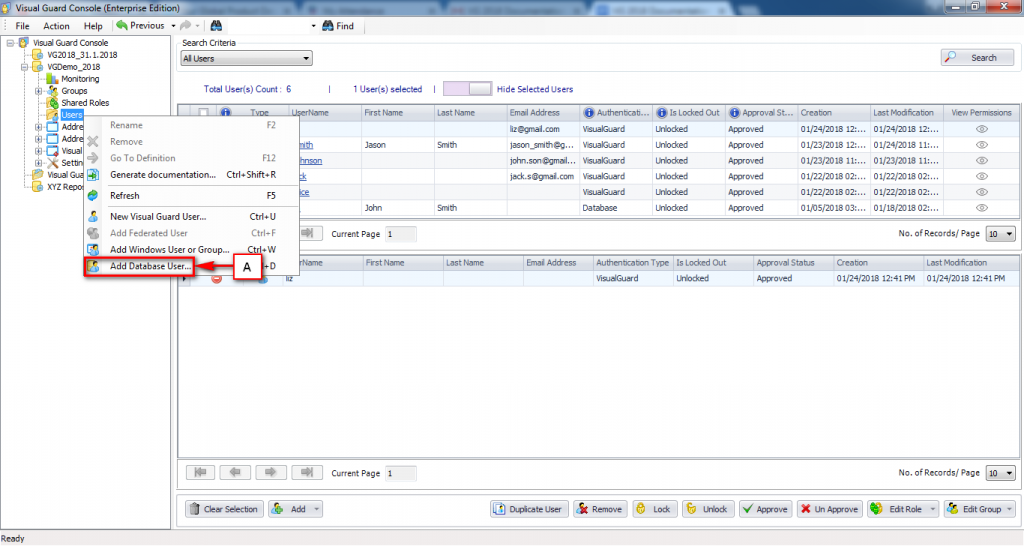
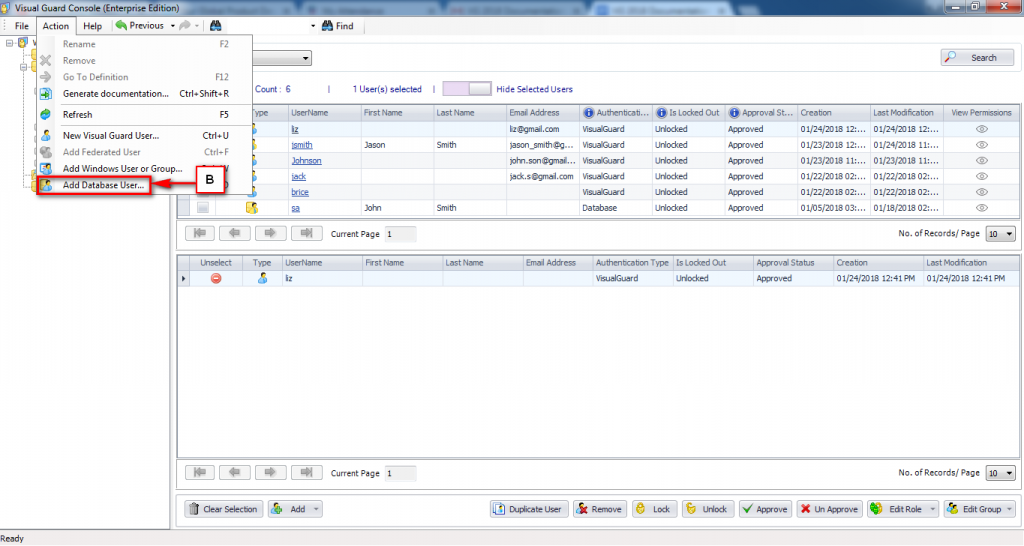
  • Access the Add Database User menu using one of the options below:
    • Right click on the Repository Name provided on the Left Navigation Panel and select Add Database User option.

OR

  • Right click on the Repository >Users menu provided on the Left Navigation Panel and select Add Database User option (A).

OR

  • Select the Repository from Left Navigation Panel and select the Add Database User menu item from Action Menu (B).

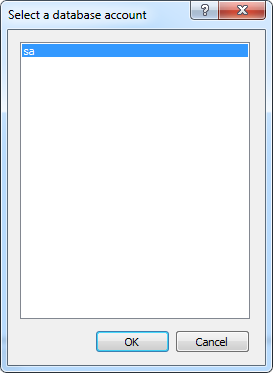
Note:

The list of accounts will only be displayed if the user account created in the sql server has server roles as sysadmin.

  • Select the database from the available accounts and click “OK” .
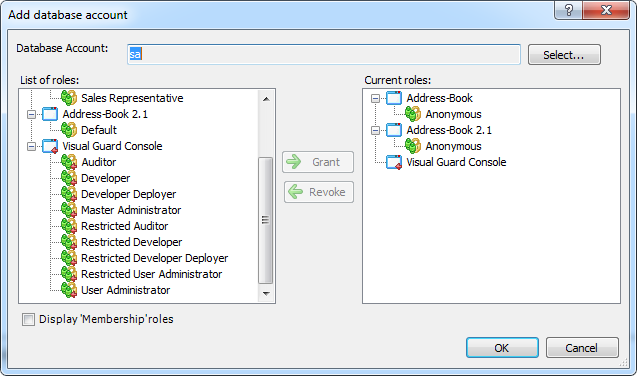
  • Add database account screen will be displayed as shown below:
  • To create a new user account you have to provide the following details:
Field nameDescription
Database AccountThis option displays the name of the database account that you selected.
You can select a different user by clicking “Select”.
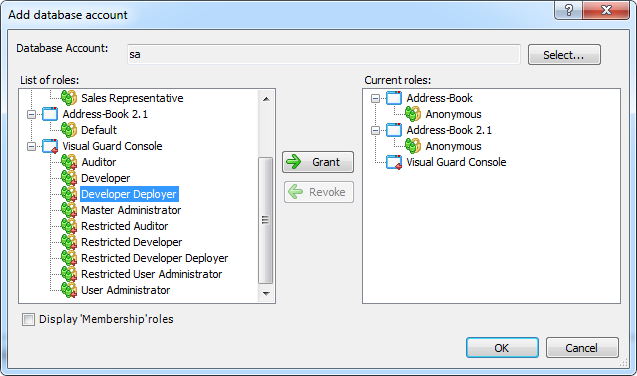
Role Assignment:This section displays the list of available and assigned roles. You can grant or revoke the roles using this section.
List of RolesThis screen displays the list of roles.
Current RolesThis section displays the list of roles that have been already assigned to the user.
Display ‘Membership’ rolesThis option allows you to display the membership access level to membership API for the application.
The user can be assigned Unrestricted, Membership Members Only only or Add Members role only.
  • After specifying the roles for the user, click “OK” to save the user details.
  • Click “Cancel” if you do not want to create the user.
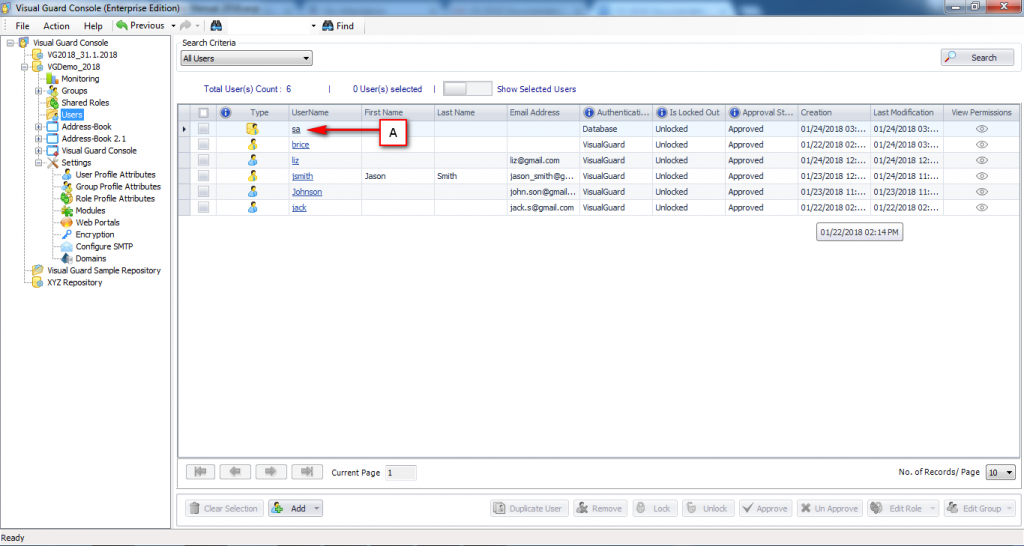
  • The new user account (A) will be displayed under Users menu in Right Panel.
  • All Database Users are represented with a different icon i.e.

See Also: 

10.3.2 Edit a Database User

Visual Guard allows you to modify the existing user accounts.

Note: You will be allowed to modify the details only if he has been assigned the privilege. Refer special roles section for more details on privilege

To edit the Database user details perform the following steps:

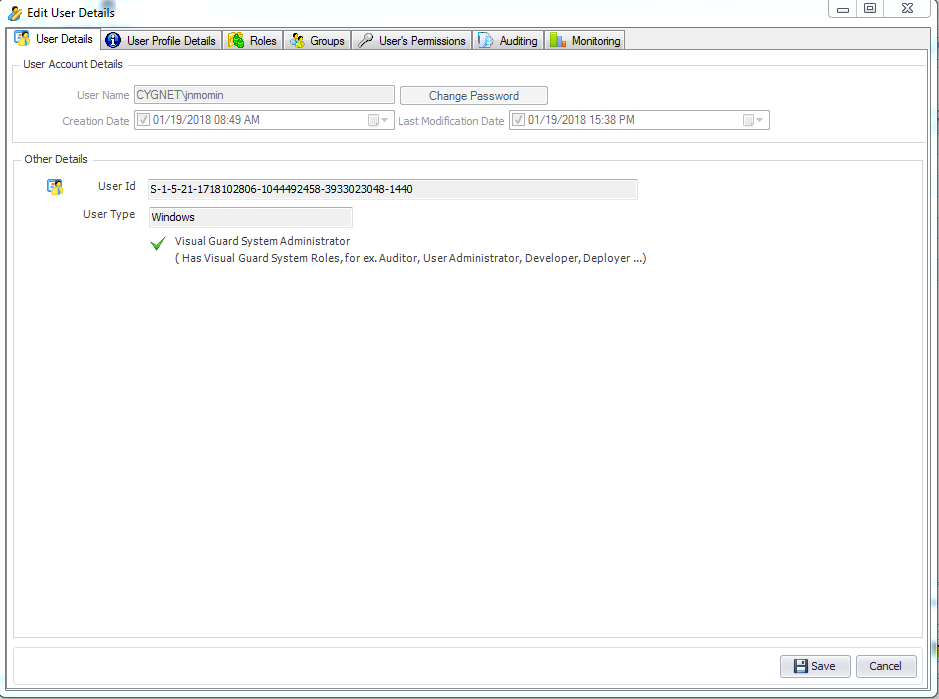
  • Select a Repository > Users from the Left Navigation Panel. All the users will be displayed in the Grid in Right Panel.
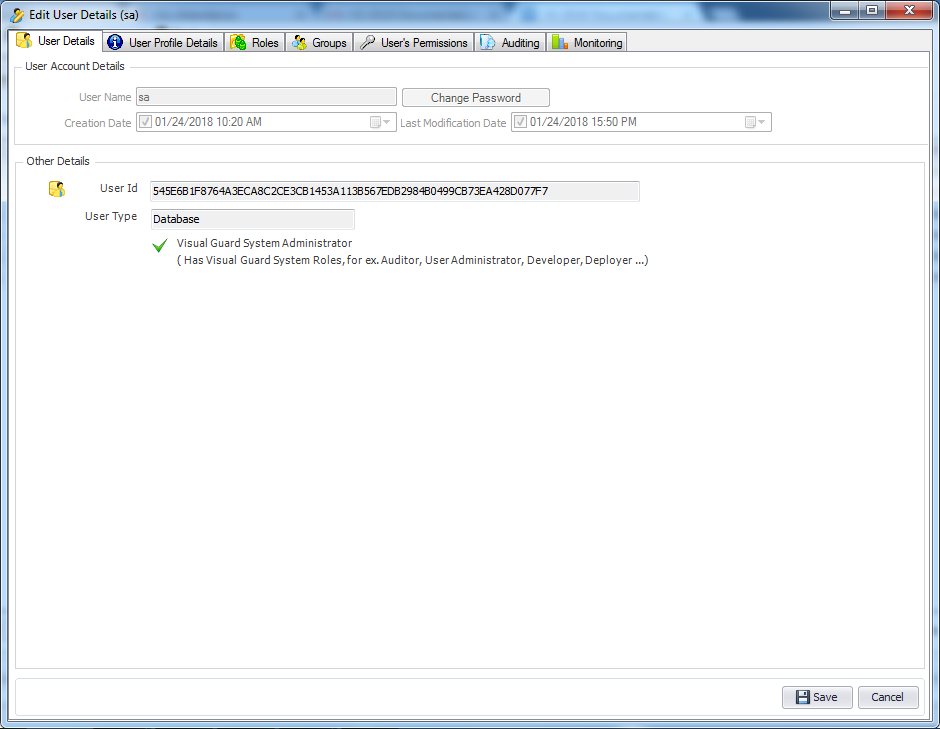
  • Click on the name of the user displayed in the Grid. “Edit User Details” Screen will open as shown below.
  • User can modify following user details using this module
FieldDescription
User Account Details
User NameDisplays the name of user as stored in database. This value cannot be modified.
PasswordThis option displays the current password of the user. This value cannot be modified.
Creation dateThis option displays the date on which the account user was created. You will not be able to modify this value.
Last Modification DateThis option displays the date on which the account user was last modified. You will not be able to modify this value.
Other Details
User IdThis option displays the unique identifier assigned to the user. This field cannot be modified.
User TypeThis option displays the user type for example Database User in current scenario.
Visual Guard AdministratorThis option displays whether the user has been assigned a role of admin or not.

See Also :

10.4 Manage Users

Visual Guard allows you to modify the existing user accounts.

Note: You will be allowed to modify the details only if you have been assigned the privilege. Refer special roles section for more details on privilege.

Follow the steps below to modify a Visual Guard User Account:

  • Login to the Repository under which user account(s) is to be modified.
  • Click on Users menu under the repository. List of all user accounts that have been created under the selected repository will be displayed as shown below: 
  • Select the Users by clicking on the username (A).
  • You can also select the user by filtering the list of users using the filter option. Click here to know more about filter option.
  • The details will be displayed in User Details tab as shown below.

See Also:

10.4.1 Search and Select Users

Visual Guard allows you to filter the list of users and select single/multiple users.

Following functionalities are provided:

  • Filter the list of users
  • Select/De-select a User
  • Refresh Page
  • As soon as you select the search criteria in the drop down (A), a Text Box/Drop Down appears (B) to enter value or select the value by which you want to search the record.

For example: In case you select User Name as search criteria, then you will have to mention user name in the textbox.

Note: The Users assigned with the System Roles are highlighted with a Yellow colored icon and all other users are highlighted with a Blue colored icon

  • Click on “Search” after entering/selecting the value by which record is to be searched. The list of users matching the search criteria will be visible in the below grid.
  • You can filter the events using various filter options.
FieldDescription
Filter Options:This section explains about the filter option details. These are the filter options available in the drop down (A)
All UsersBy default, ‘Display All’ is selected.
Select this option if you want to see the list of all the users and click on “Search”.
User NameSelect this option is you want to search for the user by its User Name.
As soon as you select this option, an Edit Box appears. Enter the Username of the user in this field by which you want to search.
First NameSelect this option is you want to search for the user by its First Name.
As soon as you select this option, an Edit Box appears. Enter the First Name of the user in this field by which you want to search.
Last NameSelect this option is you want to search for the user by its Last Name.
As soon as you select this option, an Edit Box appears. Enter the Last Name of the user in this field by which you want to search.
Email AddressSelect this option is you want to search for the user by its Email Address.
As soon as you select this option, an Edit Box appears. Enter the Email Address of the user in this field by which you want to search.
Authentication TypesSelect this option is you want to search for the user by its Authentication Types (i.e. Visual Guard Authentication, Windows Authentication, Database Authentication).

As soon as you select this option, a Drop Down appears with the following options to select
– Visual Guard Authentication
– Identity Federation Authentication
– Windows Authentication
– Database Authentication
– [list of Custom Attributes which are marked as “Is Searchable”, if any. Click here (missing link) to know how Attributes are marked as “Is Seaarchable”]

Select the Authentication Type in this field by which you want to search.
System will search for the users belonging to the applications supporting the selected Authentication Type.

If a Custom Attribute is selected, then additional parameters will be provided based on the data type of the Attribute.
For Example
, if Attribute is of Integer type (like Age), then User will be provided with option to search for the exact match of the integer entered or integer falling under the specified range.
Locked/UnLockedSelect this option is you want to search for the user by its Locked/Un-Locked Status.

As soon as you select this option, a Drop Down appears with the following options to select
Locked: If “Locked Out” check box is selected for the user in “Edit User Detail” Screen.
Unlocked: If “Locked Out” check box is NOT selected for the user in “Edit User Detail” Screen.

Select the option to search for the users with their particular Status.
Approved/PendingSelect this option is you want to search for the user by their Account Status.

As soon as you select this option, a Drop Down appears with the following options to select
Approved: If “Approved” check box is selected for the user in “Edit User Detail” Screen.
Pending: If “Approved” check box is selected for the user in “Edit User Detail” Screen.

Select the option to search for the users with their particular Account Status.
GroupSelect this option is you want to search for the users which belong to particular Group.

As soon as you select this option, a Drop Down appears with complete tree structure of the Group.

Select the Group and system will search for the users belonging to the selected Group.

Note: This option will search for the users in the selected group only. But it will not consider the users belonging to child groups of the selected group.
Group and its DescendantsSelect this option is you want to search for the users which belong to particular Group including its Sub/Child Groups.

As soon as you select this option, a Drop Down appears with complete tree structure of the Group.

Select the Group and system will search for the users belonging to the selected Group including its all Sub/Child Groups.

Note: This option will search for the users in the selected group only. But it will not consider the users belonging to sub/child groups of the selected group.

Select/De-select a User

Select user(s)

You can select either single/multiple users by selecting check box besides the name of the user (A).

You can also see the list of only selected users by clicking on “Show Selected Users” link (C).

As soon as you click on the “Show Selected Users” link, one more grid appears (D) showing the list of Selected users from all the pages.

De-select User(s)

To de-select a user you can either de-select the check box besides the user (A) or you can click on the icon   in Grid (D).

If you want to de-select all the selected users then click on  .

Refresh Page

  • You can filter the list of users. This will update the users list with updated data. 

10.4.2 Lock / Unlock Users

The Locked Out menu is used to lock the user from logging in. The users will be automatically locked out in case they exceed maximum number of invalid login attempts. Such user accounts can be un-locked by Master Admin User only.

Please Note: This operation can be performed only on Visual Guard user accounts.

The Locked out status of the user can be modified in two ways:

  • Using List of Users Screen
  • Using Edit User Screen
  • Using List of Users Screen

Note: Below steps allows you to Lock/Un-Lock the accounts of Multiple Users.

  • Select a Repository > Users from the Left Navigation Panel. All the users will be displayed in the Grid in Right Panel.
  • Select the user by clicking on the Check Box placed besides the Name of the User (A).
  • You can also select user after filtering the list of users by using the filter option. Click here to know more about filter option.

Note: The options at the bottom of the screen will be active only if at least one user is selected in the grid.

Note: You can select either single/multiple users by selecting multiple check boxes hence you can Lock/Un-Lock single/multiple users at a time.

  • Grid (B) displays the list of selected users. This grid (B) will not be visible initially. For this you need to click on “Show Selected Users” option.
  • Click on “Lock” to Lock the account of the user OR click on “Lock” to unlock the account of the user.
  • Using Edit User Screen

Note: Below steps allows you to Lock/Un-Lock the account of Single User.

  • Select a Repository > Users from the Left Navigation Panel. All the users will be displayed in the Grid in Right Panel.
  • Click on the name of the user displayed in the Grid. “Edit User Details” Screen will open.
  • Select the “Locked Out” check box (A) to Lock the account of the user OR De-Select the check box to un-lock the account of the user. The locked out user will not be able to access his account.
  • The “Locked Out” check box in “Edit User Details” screen will be selected or de-selected based on the action performed by the user.
  • Now, click on “Save” to save the details.

See Also:

10.4.3 Approve / Unapprove Users

The Approved menu shows whether the user account has been approved to be authenticated in the selected repository.

To modify the Approved status, follow either of the steps mentioned below:

  • Using List of Users Screen
  • Using Edit User Screen
  • Using List of Users Screen

Note: Below steps allows you to Approve/UnApprove Multiple Users.

  • Select a Repository > Users from the Left Navigation Panel. All the users will be displayed in the Grid in Right Panel.
  • Select the user by clicking on the Check Box placed besides the Name of the User (A)
  • You can also select user after filtering the list of users by using the filter option. Click here to know more about filter option.

Note: You can select either single/multiple users by selecting multiple check boxes. Hence you can Approve/Un-Approve single/multiple users at a time.

  • Grid (B) displays the list of selected users. This grid (B) will not be visible initially. For this you need to click on “Show Selected Users” option.
  • The grid can be hidden by clicking on “Hide Selected Users” option. This option will be visible only if selected users grid is displayed on the page.
  • Click on “V Approve” to Approve the user account OR click on   to Un-Approve the user account.
  • The “Approved” check box in “Edit User Details” screen will be selected or de-selected based on the action performed by the user.
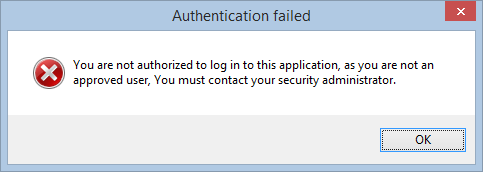
  • If the user is un-approved, then the user will not be allowed to login. When the user tries to login an error message will be displayed as shown below
  • Using Edit User Screen

Note: Below steps allows you to Approve/UnApprove Single User.

  • Select a Repository > Users from the Left Navigation Panel. All the users will be displayed in the Grid in Right Panel.
  • Click on the name of the user displayed in the Grid. “Edit User Details” Screen will open.
  • Select the “Approved” check box to Approve the account of user OR De-Select the check box to un-approve the account of the user.
  • Now, click on “Save” to save the details.

See Also:

10.4.4 Delete Users

Visual Guard allows you to delete user accounts.

Follow the steps below to delete a user account.

  • Select a Repository > Users from the Left Navigation Panel. All the users will be displayed in the Grid in Right Panel.
  • Select the user by clicking on the Check Box placed besides the Name of the User (A).
  • You can also select the user by filtering the list of users using the filter option. Click here to know more about filter option.
  • Grid (B) displays the list of selected users. This grid (B) will not be visible initially. For this you need to click on “Show Selected Users” option.
  • Click on “Remove” (B) to remove the selected User(s).
  • You will be asked for confirmation before the user is removed from the repository.
  • Click “Yes” to delete the user or click “No” to cancel the deletion.
  • The user account will be removed from the list of users.

Note:

  • Currently Logged in user cannot be deleted.
  • If multiple users are selected, then they all will be deleted.

See Also:

10.5 Edit User

10.5.1 User

A User is an individual who interacts with an application that is secured using Visual Guard’s security framework. Each user typically has a unique identity within the application’s security system and is granted specific permissions and access rights based on their role or privileges.

Here you can edit/view the below details of a user;

  • Personal Information
  • User Account details
  • Password details
  • Other VG ID details
  • Multi-Factor Authentication (MFA)

Once you are done with the updates yon the page make sure to click on Save so that your changes are reflected.

10.5.2 Profile

Profiles help administrators manage permissions more efficiently by grouping users with similar access requirements together.

Visual Guard allows you to modify the existing user profile details i.e the Job title, First Name and Last Name.

To Edit more details of the user click on the below link

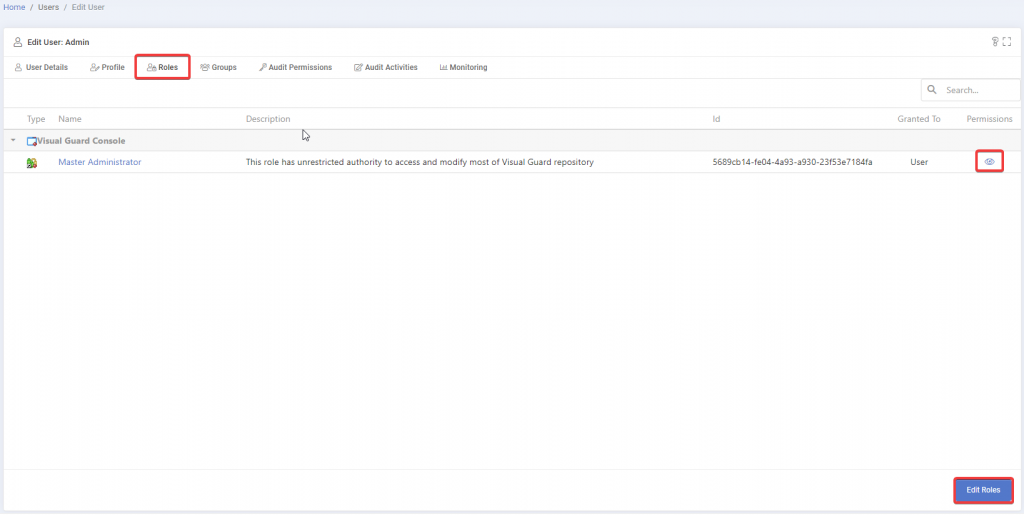
10.5.3 Roles

These are sets of permissions and access rights granted to users, facilitating efficient management of access control by grouping users with similar privileges together. Users assigned to specific roles inherit the permissions associated with those roles, streamlining security administration in applications.

  • You can click on the Eye icon to view the permissions that have been assigned to the role mentioned and to Edit further click below on Edit Roles.
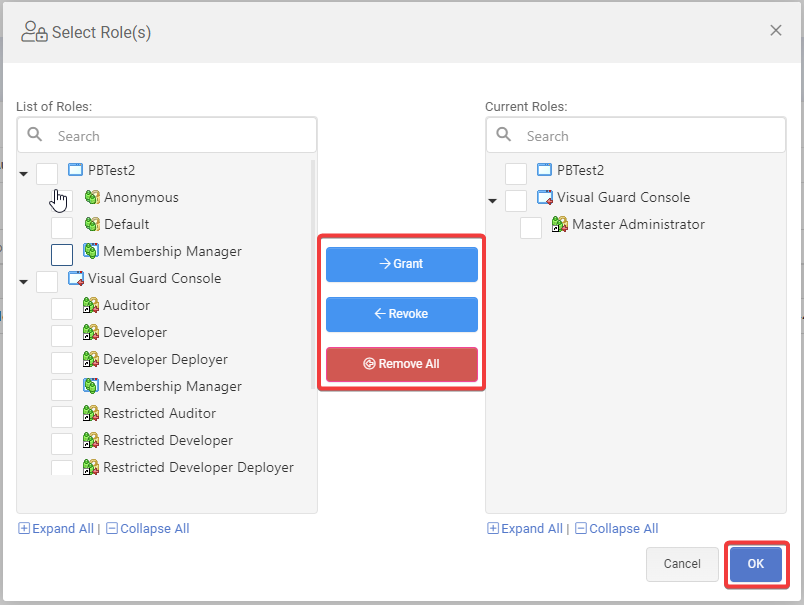
  • When you click on Edit Roles, you will get the below window where you can assign the roles to applications respectively.

Step 1: You can select the application you want to edit/view –> select roles from the left side –> click on Grant

Step 2: Similarly if you want to remove any assigned role then select the role from the right side –> click on revoke

Step 3: Click on Ok once your updates are done so that your updates get reflected


For more features related to roles refer to the below pages

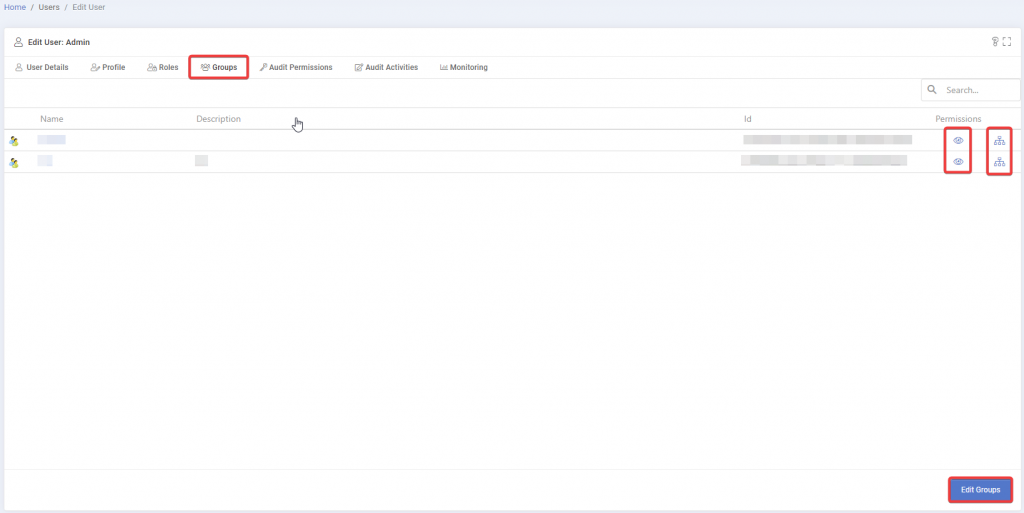
10.5.4 Groups

Groups are collections of users organized together for simplified permission management, enabling administrators to assign common access rights and privileges to multiple users simultaneously. Group memberships streamline security administration by applying permissions uniformly to users with similar roles or responsibilities.

  • You can edit/view the groups by clicking on Groups
  • You can view what permissions the groups have been assigned by clicking on the Eye Icon
  • You can also see the group Hierarchy
  • Incase you wan to edit the group click on Edit Group

  • When you click on Edit Groups, you will get the below window where you can view the groups and edit them by adding and removing as per your requirement.

Click on Ok once your updates are done so that your updates get reflected.

To know about what can be done with Groups, refer to the below link

10.5.5 Audit permissions

These refer to the capability to track and log user actions and access to resources within an application, facilitating compliance, security monitoring, and troubleshooting efforts. Administrators can configure audit permissions to capture specific events or actions, providing a comprehensive audit trail for accountability and analysis purposes.

Visual Guard allows you to view the permissions of the existing user accounts.

To modify the groups of the user, follow the following steps:

  • Click on the Hierarchy Icon under the Coming from column from the right to know where does the permission come from
  • Permission screen will be displayed as shown below. 

10.5.6 Audit Activities

Audit activities entail monitoring and logging user interactions, access attempts, and system modifications within an application, enabling comprehensive tracking for compliance, security, and troubleshooting purposes. Administrators can configure audit activities to record specific events or behaviors, ensuring accountability and facilitating analysis of system activity.

  • Here you can see the log of the user, what time and date they logged in, if it successful or not, event ID, machine name, severity
  • You can also export the activity via PDF or Excel as per your preference.

10.5.7 Monitoring

This feature allows to monitor the occurances of important events for specified time intervals for specific user in user friendly graphical format, follow the steps below:

Step 1: Log in to the Repository.

Step 2: Click on the Repository Name and click on the Users folder which will open a list of users

Step 3: Click on a specific user’s username and click on Monitoring.

Attendance Hours

  • Here you can view the number of Successfull logons and also Invalid logons
  • You have the option to browse through all the applications that are common with that specific user
  • You can also choose the timelines for which you want the data using the start date and end date option
  • Click on Refresh after entering the requirement
  • You can also take a download of the report in the type of file you prefer by clicking on the 3 lines on the right side.

Historical Data

  • Here you can view the historical data of the specific user
  • You have the option to browse through all the applications that are common with that specific user
  • Additionally here you can choose the chart legends meaning the time period of the user i.e Daily, Hourly, Monthly
  • Here you can also choose the chart type where in you can choose the type of details you want of the user except the logon details e.g.invalid password attempt, account locked attempt and much more from the drop down
  • You can also choose the timelines for which you want the data using the start date and end date option
  • Click on Refresh after entering the requirement
  • You can take a download of the report in the type of file you prefer by clicking on the 3 lines on the right side

11. Shared Role

Visual Guard allows you to assign roles to the users accounts. The roles helps to restrict access to the integrated application or Visual Guard Console.
In case the company uses multiple applications then the concept of shared roles proves to be extremely useful.

A shared role can be used for several applications allowing you to overcome the hassles of managing roles for each application individually.

Visual Guard provides various options to manage shared roles:

11.1 Duplicate

Visual guard allows you to duplicate a Shared Role within your system that mirrors an existing shared role, duplicating all similar permissions and responsibilities.

Note: This feature is exclusively available in VG 2024 and later versions.

Below are the steps to follow to duplicate an existing shared role.

Step 1: Open your application –> Go to Shared Roles –> select Shared Role –> Select Role action –> select Duplicate


Step 2: Enter the Shared Role Name, check the selected items, if they all apply to your requirement then click on Create, if not then make the necessary amendments.

You can choose to grant the below;

  • Grant to User :You have the option to choose if this duplicated role should be granted to the user with or without identitcal users of the current role
  • Grant to Group: You have the option to choose if this duplicated role should be granted to the group with or without identitcal groups of the current role
  • Identical PersmissionSets: You can assign the PermissionSets to the role, these permission sets will be configured similarly across different roles or users, providing consistent access control within the system.
  • Identical Permissions: You can assign the Permission to the role, these permissions may be configured similarly across different roles or users, providing consistent access control within the system.
  • Identical Profile: Once you check this then the profile details will be duplicated as well

11.2 New shared Role

Visual Guard allows you to create new shared role.

Note: You will be allowed to create the role only if you have been assigned the privilege. Refer roles section for more details on privilege

  • To create a new shared role:
    • Login to the Repository and select the Shared Roles .

  • Access the New Shared Role menu using any of the options below:
    • Right click on the Shared Roles and select the New Shared Role menu (A) from the popup menu.
  • Once the new shared role is created, it will be displayed in the editable mode for renaming (B). You can rename the new shared role.
  • The renamed role will be displayed as shown below:

11.3 Role Details

Visual Guard allows you to create shared role(s).

Note: You will be allowed to view the role details only if you have been assigned the privilege. Refer roles section for more details on privilege

Follow the steps below to view Role details

  • Select the Shared Roles then click on the role name Role Name from the Left Navigation Panel.
  • The details of the selected role will be displayed on the Right Navigation Panel as shown below.

11.3.1 Role Details

To view role related details follow the steps below:

  • Select the Shared Roles then click on the Shared Role Name from the Left Navigation Panel.
  • Role Details will be displayed in the Role Tab (A).
  • You can modify following user details using this module:
FieldDescription
This section explains about the fields that will not be available for editing.
NameThe role name displays the name of the role.
Select the name to modify it. Please click here (link) for more details.Enter the role name.
Full NameThis option displays the full name of the role.
Permission SetThis option displays the names of permission sets associated with the role. Please click here (link) for more details.
DescriptionThis option displays the role description. Please click here (link) for more details.
This section explains about the fields that will not be available for editing.
Last ModificationThis option displays the date on which the role was last modified.
IdThis option displays the unique identifier assigned to the role.

11.3.2 View / Granted PermissionSets

Visual Guard allows you to edit the permission set assigned to the shared role.

Note:  You will be allowed to edit permission sets only if you have been assigned the privilege. Refer roles section for more details on privilege

To edit the permission set follow the steps below:

  • Select the  Shared Roles then click on the Shared Role name from the Left Navigation Panel.
  • The details of the selected shared role will be displayed as shown below:
  • Access the Edit Permission set menu using any of the following options:
    • Right click on the shared role name and select the Edit Permission set menu (A) from the popup menu.
  • Select the permission set from the List of permission sets (B) that need to be granted. The List of permission sets will display the permission sets of all the applications integrated with the Visual Guard.
  • A shared role can be granted a single permission set only. Click “-> Granted role”  .
  • The granted permission set will be displayed in Current granted permission sets (C).
  • Once permission set is added to the Current granted permission sets, “<- Revoke”  will be enabled.
  • You can remove the granted permission set by selecting the permission set from the Current granted permission sets (C).
  • After granting the permission sets, click “OK” to save the changes or click “Cancel” to cancel the changes.

11.3.3 View / Edit Granted User list

To view and edit the list of users that have been assigned to the selected shared role follow the steps below:

  • Select the  Shared Roles then click on the Shared Role name from the Left Navigation Panel.
  • The details of the selected shared role will be displayed in Role tab (A) as shown below.
  • Select the Granted Users Tab (B).

  • The list of all users to whom the role has been currently assigned will be displayed in a form of Grid (C).

Note :

  • Using above screen, you can only view the list of the users assigned to the Shared Role.
  • You can click on the name of the user to Modify the User Details. You will not be able to Modify the “Roles” of the user from this “Edit User Details” Screen.

Grant Role to Users

  • When you select option “Grant role to users” you are provided with a screen to select users to whom the role is to be assigned.

  • Once the users are successfully assigned to the Group, below message will appear

Revoke Role from Users

  • As soon as the user is selected, “Revoke role from users” will be activated.

Note : Using the above screen, you can only revoke the roles assigned to the user. The user can be assigned the roles using User module.

See Also:

11.3.4 View / Edit Granted Groups

To view the list of groups that have been assigned to the selected shared role follow the steps below:

  • Select the Shared Roles then click on the Role name from the Left Navigation Panel.
  • The details of the selected role will be displayed.
  • The details will be displayed in Role tab (A) as shown below.
  • Select the Granted Groups Tab (B).
  • The list of all groups that have been assigned the shared role will be displayed.
  • You can only view the assigned groups.
  • You can modify the groups using groups option provided in the left navigation panel.

See Also:

11.4 Rename Shared Role

Visual Guard allows you to rename the shared role(s).

Note: You will be allowed to rename the role only if you have been assigned the privilege. Refer roles section for more details on privilege

To rename the shared role follow the steps below:

  • Select the Repository then click on the Shared Role name from the Left Navigation Panel.
  • The detail of the selected shared role will be displayed as shown below.
  • Access the Rename menu using the following option:
    • Right click on the shared role name and select Role name (A) in the role details section.

11.5 Remove Shared Role

Visual Guard allows you to remove the created shared role(s).

Note: You will be allowed to remove the roles only if you have been assigned the privilege. Refer roles section for more details on privilege

To remove a shared role follow the steps below:

  • Login to the  Shared Roles then click on the Shared Role name.
  • The detail of the selected shared role will be displayed as shown below.
  • Access the Remove menu using any of the following options:
    • Right click on the shared role name and select the Remove menu (A) from the popup menu.
  • Click “YES” to continue the deletion or click “NO” to cancel the deletion.
  • On clicking “YES” the shared role will be removed from the list of shared roles.

12. Roles

Visual Guard allows you to assign roles to the users accounts. The roles helps to restrict access to the integrated application or Visual Guard Console.
In case the company uses multiple applications then the concept of shared roles proves to be extremely useful.

See also:

12.1 Granted users

Visual Guard allows you to edit the roles assigned to the user.

To edit the users follow the steps below:

Note: Besides using the below method to edit the user you can use the following shortcut method to grant, revoke a user

  • You can remove a roles assigned to a user by right clicking on the user name and selecting Remove menu from the popup menu.
  • Access the granted users menu using any of the following options:
    • Right click on the role name and select the grant role to users or revoke role from users menu (A) from the popup menu.

OR

  • Click on the role name and then on granted users. Click on the bottom of the page on grant or revoke users.

You can also generate a permission matrix from this page.

12.2 Granted Groups

Visual Guard allows you to edit the Groups assigned to the role.

To edit the group follow the steps below:

Note: Besides using the below method to edit the group you can use the following shortcut methods to grant, revoke a group

  • By clicking on the group you can Grant/ Revoke a group.
  • You can remove a group by right clicking on the group name and selecting Remove menu from the popup menu.
  • Access the Granted Groups menu using any of the following options:
    • Right click on the role name and select the Edit groups menu (A) from the popup menu.

OR

  • Click on the role name and then on granted groups. Click on the bottom of the page on Edit groups.

12.3 Application Roles

Visual Guard allows you to manage the Roles of the application.

Visual Guard allows you to perform following actions:

12.3.1 Duplicate

Visual guard allows you to duplicate role within your system that mirrors an existing role, duplicating all similar permissions and responsibilities.

Note: This feature is exclusively available in VG 2024 and later versions.

Below are the steps to follow to duplicate an existing role.

Step 1: Open your application –> Go to Roles –> select Role action –> select Duplicate


Step 2: Enter the Role Name, check the selected items, if they all apply to your requirement then click on Create, if not then make the necessary amendments.

You can choose to grant the below;

  • Grant to User :You have the option to choose if this duplicated role should be granted to the user with or without identitcal users of the current role
  • Grant to Group: You have the option to choose if this duplicated role should be granted to the group with or without identitcal groups of the current role
  • Identical PersmissionSets: You can assign the PermissionSets to the role, these permission sets will be configured similarly across different roles or users, providing consistent access control within the system.
  • Identical Permissions: You can assign the Permission to the role, these permissions may be configured similarly across different roles or users, providing consistent access control within the system.
  • Identical Profile: Once you check this then the profile details will be duplicated as well

12.3.2 Creating Application Roles

Visual Guard allows you to create new role for restricting user or allowing them access.

Note: You will be allowed to create the permissions only if you have been assigned the privilege. Refer special roles section for more details on privilege

  • You can assign a Permission Set directly to a role by drag & and drop
  • You can directly revoke a Permission Set by selecting it and pressing the delete key

Follow the steps below to create a role:

  • Login to the Repository and select the Application name under which the permission(s) is to be created.

  • Access the New Role option using one of the options below:
  • Click on the Application > Roles.
  • Click on the and select Add Role from the popup menu (B).

  • As the new role is created, it will be in editable mode for renaming. You can rename the new role.
  • The renamed role will be displayed as shown below:

See Also:

12.3.3 Modify Permission Set

Visual Guard allows you to edit the permission set assigned to the role.

To edit the permission set follow the steps below:

Note: Besides using the below method to edit the Permission Set you can use the following shortcut methods to grant, revoke a permission set

  • By clicking on the permission set you can Grant/ Revoke a permission set.
  • You can remove a permission set by clicking on the permission set name and selecting Remove menu from the popup menu
  • Access the Edit Permission Sets menu using any of the following options:
    • Click on the role name and select the Edit Permission Sets menu (A) from the popup menu.
  • Select the permission set from the List of permission sets (B) that need to be granted. By default the first permission set will be selected.
  • A Role can be granted a single permission set only. Click “-> Grant” .
  • The granted permission set will be displayed in Current granted permission sets (C).
  • Once permission set is added to the Current granted permission sets“<- revoke” will be enabled.
  • You can remove the permission set by selecting the permission set from the Current granted permission sets (C).
  • After granting the permission sets, click “OK” to save the changes or click “Cancel” to cancel the changes.

See Also:

12.3.4 Granted Permissions

Visual Guard allows you to edit the permission assigned to the role.

To edit the permission follow the steps below:

Note: Besides using the below method to edit the Permission you can use the following shortcut methods to grant, revoke a permission

  • By clicking on the permission you can Grant/ Revoke a permission.
  • You can remove a permission by right clicking on the permission name and selecting Remove menu from the popup menu.
  • Access the Edit Permission List menu using any of the following options:
    • Right click on the role name and select the Edit Permission List menu (A) from the popup menu.

OR

    • Click on the role name and then on granted permission. Click on the bottom of the page on Edit Permissions.
  • Select the permission from the List of permission (B) that need to be granted. By default the first permission will be selected.
  • A Role can be granted a single permission only. Click “-> Grant” .
  • The granted permission will be displayed in Current granted permission (C).
  • Once permission is added to the Current granted permission“<- Revoke” will be enabled.
  • You can remove the permission by selecting the permission from the Current granted permission (C).
  • After granting the permission , click “OK” to save the changes or click “Cancel” to cancel the changes.

See Also:

12.3.5 Modify Role

Visual Guard allows you to view the Role Details and manage the assigned groups and users.

Follow the steps below to view Role details:

  • Login to the Repository and select the application of which the Roles are to be viewed.
  • Click on “+” icon of Roles option available in Left Panel. List of Roles created under the selected application will be visible (A).
  • Select the Role from left panel which is to be modified.
  • The details of Role will be displayed in right panel (B) as shown below.

See Also:

12.3.6 Remove Role

Visual Guard allows you to remove the created role.

Note: You can also Remove a Role by selecting it and pressing the delete Key

To remove the role, follow the steps below:

  • Select the Application > Roles > Role name from the Left Navigation Panel.
  • The detail of the selected role name will be displayed.
  • Access the Remove menu using the following option:
    • Select the role name and select the Remove menu (A) from the popup menu.
  • Click “YES” to continue the deletion or click “NO” to cancel the deletion.
  • The role will be removed from the list of roles.

See Also:

12.3.7 Rename Role

Visual Guard allows you to rename the roles.

To rename the role, follow the steps below:

  • Select the  Application name > Roles > Role name from the Left Navigation Panel.
  • The detail of the selected role will be displayed.
  • Access the Rename menu using any of the following options:
    • Click on the role name and select role name from the edit role menu (A).

See Also: 

13. Application

An Application is a software program that has been integrated with Visual Guard for security management purposes. This integration allows the application to utilize Visual Guard’s comprehensive security features, including user authentication, authorization, role-based access control, and audit trails, directly from the WebConsole interface. The application leverages its framework to secure access, manage user roles and permissions, and enforce defined security policies, thereby ensuring that only authorized users can access sensitive functionalities and data within the application.

Below are the setting you can setup for your application.


1. Attendance Hours Chart

This shows the number of successfull and invalid attempts


2. Application Details

  • Name: The application name is displayed
  • Version: The version of the application
  • ID: The ID number of the application
  • Description: Here you get a few details about what the application is

3. Application Security

  • Anonymous Role: This refers to a predefined role assigned to users who access the application without authenticating themselves. This role allows unauthenticated users to perform specific actions or access certain parts of the application based on permissions associated with the Anonymous Role. It’s a way to manage and restrict what unauthenticated users can see or do within the application, ensuring that sensitive areas remain secure while still providing a level of access to public-facing features.
  • Anonymous System Role: This role is system-defined and automatically applied to all unauthenticated users, dictating what actions they can perform or what parts of the application they can access without having a registered account or identity within the system.
  • Default Role: These are predefined roles automatically assigned to all authenticated users upon login, unless specified otherwise. This role serves as a baseline set of permissions that apply to users by default, ensuring that every user has a minimum level of access and capabilities within the application.
  • Membership Access Level: Here you can categorize the access rights or permissions granted to users based on their membership in specific roles or groups within the application.

4. Contextual Settings

  • Group Selection Display Mode: This configures the presentation and selection of user groups, enhancing the ease of managing roles and permissions. This feature streamlines the assignment process, improving administrative efficiency in access control.
  • Group Selection Mode: Determines how administrators can select user groups for assigning roles and permissions, offering a simplified or detailed view to facilitate efficient management of user access rights.
  • Role Selection Display Mode: Here the system adjusts how roles are displayed and chosen, optimizing the interface for administrators to easily assign or modify user roles and their corresponding permissions.

5. Application Actions

  • Generate Config Files: Involves creating essential configuration files that define application settings and parameters. These files are pivotal for customizing and initializing the application’s runtime environment.
  • Remove: By clicking on the remove button the application will be removed from the repository.

Once you select your preferred setting click on Update for the settings to reflect


13.1 New Application

In the context of Visual Guard, an application could be any software system or service that requires authentication and authorization mechanisms to control access to its resources and functionalities.

Step 1: Click on New Application on the left hand side of the page


Step 2: Select the type of Application you are creating


Step 3: Fill in the details of the application i.e the name, description, type, framework and click on Add

By ticking the Getting started checkbox you will get a quick guide of setting up your application.


Step 4: Once you click Add, the Application will be created and you will be redirected to the identity client settings page to configure the settings for the application.

You can configure the settings and click on Update once done


Refer to the below document for further details about the configuration of the Identity Client


13.2 Edit Application

Visual Guard allows users to modify the details of the application integrated with it.

Follow the steps below to modify the details of an integrated application.

  • Login to the Repository under which the application details are to be modified.
  • Select the application from the Left Navigation Panel, the application details will be displayed on the Right Navigation Panel as shown below.

13.2.1 Description

This description displays brief information about the selected application.

To modify the Description related to the application follow the steps below:

  • Select the Repository > Application name from the Left Navigation Panel.
  • The details of the selected application will be displayed as shown below:
  • Click on the Description option on the Right Navigation Panel (A).
  • Enter the new Description. The new Description will be stored automatically.

13.2.2 Application name

The Name indicates the name of the application that is being integrated.

To modify the Name, follow the steps below:

  • Select an Application from the Left Navigation Panel.
  • The application details of the selected application will be displayed as shown below.
  • Modify the Name using the option below:
    • Right-click on the application name in the Left Navigation Panel and select the Rename menu (A).

13.2.3 Version

  • The Version displays the version of the permissions of the application.
  • This allows you to manage multiple versions of your permissions according to multiple versions of the application.
  • The number of the version is necessary to manage different version of application.
  • The best way to change the version number is to do it by creating a new version.

To modify the Version follow the steps below:

  • Select the Application name from the Left Navigation Panel.
  • The application details of the selected application will be displayed as shown below.
  • Click on the Version option on the Right Navigation Panel (A).
  • Enter the Version. The new Version will be stored automatically.

Note: The new version number should be higher than the older one.

13.2.4 Anonymous Role

The Anonymous Role displays whether an anonymous role is being used for the application. If your application requires an authentication this field must set to the value “None”.

Note: If multiple roles exist in the list, you have to select an appropriate role that will be used for anonymous session.

To modify the Anonymous Role follow the steps below:

  • Select the Application name from the Left Navigation Panel.
  • The details of the selected application will be displayed as shown below:
  • Click on the Anonymous Role option on the Right Navigation Panel (A)v will be displayed.
  • Click v , a dropdown list will appear as shown below.
  • Select the v option if you want to allow an anonymous session for the application or uncheck if do not want an anonymous session.  
  • Select “ok”  to continue.
  • To use the changes in the application, you need to regenerate the configuration files of the applications. Click here to know about generating Visual Guard configuration files.
  • The changed value will be saved and displayed as shown below.

13.2.5 Default

The Default Role displays the role granted by default to each new registered user.

To modify Default Role follow the steps below:

  • Select the Application name from the Left Navigation Panel.
  • The details of the selected application will be displayed as shown below.
  • Click on the Default Role option on the Right Navigation Panel (A), v will be displayed.
  • Click v a dropdown list will appear as shown below.
  • Select check box option if you want to allow a default role for the application or uncheck if you do not want a default role.
  • On checking the check box option, the list below it will be enabled.
  • Select the role as default role from the list. The selected role will be saved automatically.

13.2.6 Membership Access Level

The Membership Access Level indicates the level of access granted in an application to a particular user.

To modify the membership access level, follow the steps below:

  • Select the  Application name from the Left Navigation Panel.
  • The application details of the selected application will be displayed as shown below.
  • Select the Membership Access Level from the Right Navigation Panel (A),”v” will be displayed.
  • Click “v” a dropdown list will appear.
  • Select any one of the option from the dropdown list.
Field NameDescription
No AccessNo one can change the security of this application with VG membership API
AddMembersonlyOn selecting this option, the users can change the security of this application.
Using VG membership API, they can only add users and grant them the default role in this application
ReadAllMembersOnlyOn selecting this option, the security of this application can be changed by users with the role “CanReadmembership ”.
They can use VG membership API to read users and roles.

13.3 Event Viewer

Visual Guard allows you to view the monitoring and troubleshooting messages from the application of the repository.

Follow the steps below to view the events:

  • Select the Repository > Application from the Left Navigation Panel.
  • The application detail of the selected application will be displayed as shown below.
  • Access the Event Viewer option using the option below:
    • Right click on the application name and select the Event Viewer option (A) from the popup menu.
  • You can filter and view the events occurred in the repository. You can also filter the events using various filter options (C).
FieldDescription
Filter Options:This section explains about the filter option details.
Filter TypeSelect any one of the filter type from the available filters (Display All, Username, Event Id and Event Category). By default, ‘Display All’ is selected.
StartSelect the start date and time from when you want to filter. By default, this option is disabled. To enable it, click on the check option. After enabling, you can select the date by clicking V.
EndSelect the end date and time till when you want to filter. By default, this option is disabled. To enable it, click on the check. After enabling, you can select the date by clicking V.
SearchWhen you click on this option, the system will search for all events matching the specified criteria.
Event CategoryEvent category option will be displayed only when Event Category option is selected from filter drop down.For User Name option Username field will be displayed and for Event ID option Event ID field will be displayed.
  • As soon as you click on “Find” the result will be displayed as shown below.
  • The system allows you to perform:
    • Refresh: This option allows you to refresh the contents, once you click on this option any new event will be appended to existing list.

13.4 Monitoring

  • This feature allows to monitor the occurrences of important events for specified time intervals for selected application in user friendly graphical format, follow the steps below:
  • Click on the Repository Name and click on “+” besides Application
  • Click on Monitoring (A) .

See also: 

13.5 Manage permission

Visual Guard allows you to create new permission for restricting user or allowing them access.

Note: You will be allowed to create the permissions only if you have been assigned the privilege. Refer special roles section for more details on privilege.

Follow the steps below to create a permission:

  • Login to the Repository and select the Application name under which the permission(s) is to be created. 
  • Access the New Permission using the option below:
    • Right click on the Application > Permissions and select the Create Permission menu (A).
  • As the new permission is created, it will be in editable mode for renaming. You can rename the new permission.
  • The renamed permission will be displayed as shown below:

13.6 Manage permission set

Permission Set stores the set of rules to access a particular application.

Note: You will only be allowed to create the permission set if you have been assigned the privilege. Refer special roles section for more details on privileges.

Follow the steps below to create a Permission Set:

Login and select the Application name under which permission set is to be created.

  • Access the New Permission Set using one of the options below:
    • Right click on the Repository > Application> Permission Set from the Left Navigation Panel and select the New Permission Set menu (A) from the popup menu.
  • Once the new permission set is created you can rename it. For example Special Permission Set.
  • The renamed permission set will be displayed as shown below:

See Also: 

13.7 Manage roles

Visual Guard allows you to create new role for restricting user or allowing them access.

Note: You will be allowed to create the permissions only if you have been assigned the privilege. Refer special roles section for more details on privilege

  • You can assign a Permission Set directly to a role by drag & and drop
  • You can directly revoke a Permission Set by selecting it and pressing the delete key

Follow the steps below to create a role:

  • Login to the Repository and select the Application name under which the permission(s) is to be created.
  • Access the New Role option using the option below:
    • Right click on the Application > Roles and select the Add Role menu (A) from the popup menu.
  • As the new role is created, it will be in editable mode for renaming. You can rename the new role.
  • The renamed role will be displayed as shown below:

See Also: 

13.8 Settings

13.8.1 Identity Client

The following settings are designed to assist you in configuring your application for communication with the Visual Guard Identity Server.

Application –> Setting –> Identity Client

  1. Primary Information: Essential data or key details that are fundamental to understanding the application.

2. Identity Resources: Components in configuring and enforcing authentication and authorization policies within the Visual Guard system


3. URI Information & CORS: Refers to Uniform Resource Identifiers (URIs), which are strings of characters used to identify a resource, typically on the internet.

CORS: Refers to Cross-Origin Resource Sharing (CORS), which is a mechanism that allows resources on a web page to be requested from another domain outside the domain from which the resource originated.


4. Grant Types: This refers to the different methods or protocols used for obtaining access tokens or permissions in a system. Common grant types include Authorization Code Grant


5. Secret Keys: This is a piece of confidential information, typically a long string of characters, used for cryptographic purposes, such as encrypting and decrypting data, or for authenticating communication between parties.


Note: Make sure to click on Save everytime you make any edits, so that the update is reflected further.


13.8.2 MFA Policy

An MFA policy in an application refers to the set of rules and guidelines that dictate how Multi-Factor Authentication (MFA) is implemented within that specific application.This policy determines when and how users are required to provide additional verification, beyond just a password, to authenticate their identity.

You can go to the application drop down –> setting –> MFA Policy and setup up your rules.

  1. Select the type of method you are opting for the security under preferences information
  • OTP via email or phone
  • Secure link via email or phone

2. The number of Grace logins (allows users a limited number of logins, or a period of time, to access a system without completing the usual authentication requirements) you would like to provide.

3. Provide the setting required under Session scope information

  • Scope: choose where you want the setting to reflect either under the whole Repository or specific Application
  • Duration: You can mention the time till when you want this feature to be active till

4. Incase you want to allow a user to use the application even if MFA is not enabled click Allow on the other information section

13.9 Generate file configuration

Visual Guard can generate a configuration file via the application page. 

  • The configuration file contains the information about the repository used by the application.
  • To download it, go to the bottom of the application dashboard as shown below: 
  • Click on “Application Actions”> “Generate config Files”
  • Then a page to download it on your computer will open.  

14. Permissions

Visual guard allows you to grant different permissions to users/ groups or roles. These permissions allows differents type of actions on the webconsole.

To know more about the permissions, follow the article below:

14.1 Create

Visual Guard allows you to create new permission for restricting user or allowing them access.
Note: You will be allowed to create the permissions only if you have been assigned the privilege. Refer special roles section for more details on privilege.

Follow the steps below to create a permission:

  • Login to the Repository and select the Application name under which the permission(s) is to be created.
  • Access the New Permission using one of the options below:
    • Right click on the Repository > Application > Permissions and select the Permission Action then click on “Create Permission” menu (A).
  • As the new permission is created, it will be in editable mode for renaming. You can rename the new permission.
  • The renamed permission will be displayed as shown below:

See Also: 

14.2 Rename

Visual Guard allows you to rename the permission.

To rename the permission, follow the steps below:

  • Select the Repository > Application name > Permissions > Permission name from the Left Navigation Panel.
  • The detail of the selected permission name will be displayed.

  • You can access the Rename menu using any of the following options:
    • Right click on the permission name and select the “Permission name” (A) from the edit permission menu.

14.3 Remove

Visual Guard allows you to remove the created permission.

To remove the permission, follow the steps below:

  • Select the Repository > Application > Permission > Permission name from the Left Navigation Panel.
  • The detail of the selected permission name will be displayed.
  • Access the Remove menu using any of the following options:
    • Right click on the permission name and select the Remove menu (A) from the popup menu.
  • Click “OK” to continue the deletion or click “Cancel” to cancel the deletion.
  • The permission will be removed from the list of permissions.

14.4 Duplicate

Visual Guard allows you to duplicate the created permission.

Please Note: When you duplicate a permission it will automatically duplicate the Property / Action script created under the duplicated Permission.

To duplicate the permission follow the steps below:

  • Select the Repository > Application > Permission > Permission name from the Left Navigation Panel.
  • The details of the selected permission name will be displayed.


  • Access the Duplicate menu using any of the following options:
  • Right click on the permission name and select the Duplicate menu item (A) from the popup menu.

OR

  • Select the permission name from the Left Navigation Panel and select the Duplicate menu item from the Action menu (B).
  • The permission will be duplicated as shown below.

14.5 Creating a Permission folder

New Folder option allows you to add a new folder.

To add a new folder, follow the steps below:

  • Select the Repository > Application name > Permissions from the Left Navigation Panel.
  • The detail of the permission under the repository will be displayed.
  • You can access the New Folder menu using any of the following options:
    • Right click on the permission folder and select the New Folder menu (A) from the popup menu.
  • Once a new folder is created you can group permissions under the new folder.
  • You can either create a new permission or drag or drop existing permission in the folder.
  • In case you drag and drop permission from some existing folder it will be removed from existing folder and replaced in the new folder.

14.6 PowerServer Security

In specifics application you will have an Action called “Add PowerServer security”.

It can be find by clicking on permissions > name of the permissions > Actions > Add PowerServer Security.

  • After clicking on it, five differents type of Actions will be available.
  • These five actions are : CanCreate, CanRead, CanUpdate, CanDelete, CanExecute. These actions can be applied on Adress, customers, Order or product.

These Actions can also be applied on permissions:

  • To apply an action check the corresponding box then click on save to save it or reset to cancel the action.

15. Permission sets

Visual guard allows you to grant different groups of permissions to users/ groups or roles. These permissions sets allows differents type of actions on the webconsole.

To know more about the permissions sets, follow the article below:

15.1 Create

Permission Set stores the set of rules to access a particular application.
Note: You will only be allowed to create the permission set if you have been assigned the privilege.

Refer special roles (missing links) section for more details on privileges.

Follow the steps below to create a Permission Set:

  • Login to the Repository and select the Application name under which permission set is to be created.
  • Access the New Permission Set using one of the options below:
    • Right click on the Repository > Application> Permission Set from the Left Navigation Panel and select the Create Permission Set menu (A) from the popup menu.
  • Once the new permission set is created you can rename it (A). For example New Special Permission Set.
  • The renamed permission set will be displayed as shown below:

See Also:

15.2 Modify

Visual Guard allows you to modify the details of the current permission set.

Note: You will be allowed to modify the details only if you have been assigned the privilege. Refer roles section for more details on privilege.

To modify the details follow the steps below:

  • Select the Repository > Application > Permission set > Permission set name from the Left Navigation Panel.
  • The details of the selected permission set will be displayed on the Right Navigation Panel (A) as shown below.
  • You can modify the following details using this module.
FieldDescription
This section explains about all the editable fields
NameThe name displays the name of the permission set.
Select the name to modify it. Please click here for more details.
DescriptionThis option displays a short description of the permission set.
Select the description to modify it. Please click here for more details.
RolesThe role displays the roles assigned of the permission set.
Select the role name and click on the … to modify it. Please click here for more details.
Granted permissionsThe Granted permissions displays the list of permissions granted to the permission set.
Select the permission name and click on the … to modify it. Please click here for more details.
Granted Permission SetsThe Granted Permission Sets displays the list of permission sets granted to the permission set.
Select the permission set name and click on the … to modify it. Please click here for more details.
This section explains about the fields that will not be available for editing.
Last ModificationThis option displays the date on which the permission set was last modified.
IdThis option displays the unique identifier assigned to the permission set.

15.3 Description

Visual Guard allows you to modify description related to the permission set.

To modify the description follow the steps below:

  • Select the Repository > Application > Permission Set > Permission set name from the Left Navigation Panel.
  • The details of the selected permission set will be displayed as shown below.
  • Click on the Description menu (A) from the Right Navigation Panel.
  • Enter the new Description. The new Description (B) will be stored automatically.

15.4 Edit Permission Set List

This module allows you to grant or revoke list of permissions set associated with the selected permission set.

To grant or revoke list of permissions sets to a permission set follow the steps below:

Note: Besides the below option you can assign a permission set to a permission set by directly dragging and dropping the selected permission set to the permission set.

Select the Repository > Application > Permission Set> Permission set name from the Left Navigation Panel.

The selected permission set details will be displayed.

  • You can access the Edit permissions set list menu using one of the following options:
    • Right click on the permission set name and select the Edit permission set menu (A) from the popup menu.
  • Select the permission set that needs to be granted from list of permissions sets (A).
  • You can grant multiple permission set at a time. Once permission set (A) is selected, Grant (B) will be enabled.
  • Click “-> Grant” , the granted permission set will be displayed in Current granted permission sets section (C).
  • User can remove the permission set by selecting the permission set from Current granted permission list. You can revoke multiple permission set at a time.
  • Click “<- Revoke”  to remove the permission set. The removed permission set will again be available in List of permission sets (D).
  • Click “OK” to save the permission sets or click “Cancel” to discard the changes.
  • Once you save the details, the list of Granted permission sets would be updated.

15.5 Role

Visual Guard allows you to modify the roles associated with a permission set.

To modify roles follow the steps below:

  • Select the Repository > Application > Permission Set > Permission set name from the Left Navigation Panel.
  • The detail of the selected permission set will be displayed as shown below.
  • Click on the Roles (A) option on the Right Navigation Panel. Click “…” that appears at the end.
  • Select roles of ‘permission set name’ screen will be displayed. For example in current scenario the screen name is “Select roles of Full Trust permissions”.
  • Select the role that needs to be granted from list of roles (A).
  • User can grant multiple roles at a time. Once role is selected Grant (B) will be enabled.
  • Click “-> Grant” , the granted role will be displayed in Current roles section (C).
  • You can remove the role by selecting the role from Current roles list. You can revoke multiple roles at a time.
  • Click “<- Revoke”  to remove the role. The removed role will again be available in List of roles.
  • Click “OK” to save the roles or click “Cancel” to discard the changes.
  • Once the user saves the details, they will be displayed as shown below:

15.6 Edit Permission List

This module allows you to grant or revoke list of permissions assigned to a permission set.

To grant or revoke list of permissions to a permission set follow the steps below:

Note: In addition to the below option you can also assign a permission to a permission set by directly dragging and dropping the permission to the permission set.

  • Select the Repository > Application > Permission Set> Permission set name from the Left Navigation Panel.
  • The selected permission set details will be displayed.
  • You can access the Edit permissions list menu using one of the following options:
    • Right click on the permission set name and select the Edit permission menu (A) from the popup menu.
  • Select the permission that needs to be granted from list of permissions (A).
  • You can grant a single permission at a time. Once permission (A) is selected, Grant (B) will be enabled.
  • Click ” ->  Grant” , the granted permission will be displayed in Current granted permissions section (C).
  • User can remove the permission by selecting the permission from Current granted permission list.
  • Click “<- Revoke”  to remove the permission. The removed permission will again be available in List of permissions (D).
  • Click “OK” to save the permissions or click “Cancel” to discard the changes.
  • Once you save the details, the list of Granted permissions will be updated.

15.7 Rename

Visual Guard allows you to rename the permission set.

To rename the permission set, follow the steps below:

  • Select the Repository > Application name > Permissions Set> Permission Set name from the Left Navigation Panel.
  • The details of the selected permission set will be displayed.
  • You can access the Rename menu using one of the following options:
    • Right click on the permission set name and select the Permission Set Name menu (A) from the popup menu.

15.8 Remove

Visual Guard allows you to remove the created permission set.

To remove the permission set, follow the steps below:

  • Select the Repository > Application > Permission Set> Permission set name from the Left Navigation Panel.
  • The detail of the selected permission set will be displayed.
  • Access the Remove menu using any of the following options:
    • Right click on the permission set name and select the Remove menu (A) from the popup menu.
  • Click “Yes” to continue the deletion or click “NO” to cancel the deletion.
  • The permission set will be removed from the list.

16. Workflow

The Workflow is a system meant to personalized notifications or actions in the Visual Guard Webconsole. 

  • An unlimited numbers of workflows can be created. Every Workflow created is registered in the Manage workflow page. 

To know more about the Workflows, follow the articles below:

16.1 Monitoring

The Workflow is a system meant to personalized notifications or actions in the Visual Guard webconsole

The monitoring page shows the numbers of the executions of a workflows on the Vg webconsole and when it has been done.

All the details are displayed in this chart:

When clicking on a bar, details are exposed as below:

16.2 Visual Guard Workflows

The Visual Guard Workflow is a system that allows you to customize notifications or actions in the Visual Guard WebConsole. 

  • You can create an unlimited number of workflows. Each created workflow is available in the Manage workflow page. 

The page indicates:

  • Whether the workflow is activated or not: (A) “Inactive” or “Active”
  • The name of the workflow. Example: New Workflow (B)
  • The description, which usually indicates the purpose of the workflow (C)
  • The date of latest modification (D)

See also: 

16.3 Create workflow

The Workflow is a system meant to personalized notifications or actions in the Visual Guard Webconsole.

Step 1: To create a workflow, click on Workflows on the left navigation panel –> Manage workflow –> create a workflow (A)


Two types of Workflows can be created: 

  • Create notification on user action: Allows administrators to set up automated notifications triggered by specific user actions. This feature helps in monitoring and responding to critical events in real-time, enhancing security and operational efficiency.

OR

  • Create a custom workflow: Allows administrators to design and implement tailored workflows to automate security processes and user management tasks, enhancing efficiency and control.

Click on the below icons to know how to setup the workflows


16.3.1 Create a custom Workflow

Step 1: To create a workflow, click on Workflows on the left navigation panel –> Manage workflow –> create a workflow –> Create custom workflow 


Step 2: Enter a name and the description of the Workflow.

  • The name in (A)
  • The description in (B)

Step 3: Define the 2 parameters:Trigger & Event

  • The trigger: open the dropdown list below and choose between the three possible triggers: 
  1. EventLog

2. Intervale: If you select the Interval, the interval trigger will have to be chosen as below : 

3. Schedule: If you select schedule, one or several days of the week have to be selected and a schedule time has to be filled : 


Step 4: After choosing all the settings of the workflow, click on create in the right corner of the page.


Step 5: To add parameters and “events” to the workflow, click on it once it is created and follow these instructions : Edit a workflow


See also: 

16.3.2 Create notification on user action

Step 1: To Create a notification on a user action, click on Workflows on the left navigation panel –> Manage workflow –> create a workflow –> Create notification on user action.

  • The name can be defined in the “name” box (A)
  • The Event can be defined in the “Event” box (B)
  • An infinity of events can be chosen to define the workflow : 

After choosing the name and defining the event, 

  • Enter the description of the Workflow that is being created (C) 
  • Enter below the receiver(s) of the email / notification and click on add (D)
  • The chosen Email will be added in the “selected receiver Email”

After choosing these parameters, enter the email that is going to be send as notification in “Email body”. 

  • Other parameters can be chosen
    • Global variable
    • Parameteres
    • Special Parameteres 

16.4 Workflow system

16.5 Edit Workflow

After creating a custom Workflow, many settings and parameters can be defined.

Click on the created Workflow, and this page will open: 

  • The trigger here is the modification of a password. 
  • To add details to this workflow, click on the white full circle in the middle. 

This page will open: 

  • “Nodes” can be selected, they are different settings that will add events to the workflow. 
  • Instructions can also be selected. For now the only instructions is “If Else”
  • All the nodes are explained in this section: Operations
  • After choosing a Node, a page of settings has to be filled. 

See also: 

16.6 Operations

The Workflow is a system meant to personalized notifications or actions in the Visual Guard Webconsole.

Once a workflow is created, nodes can be added that specify the actions of the Workflow and add details.

There are many types of nodes they are all available in the articles below. 

16.6.1 If Else

The nodes If/Else is the instructions node, to select it, click on the box If Else as shown below: 

After clicking, this page will open: 

  • To name it, fill the box “Name” with the chosen name.
  • A Display name can be chosen and filled in the box below the name box
  • Write the description
  • To write an expression follow the example shown : 

This is an intrinsic part of the nodes. 

  • You can Add Operators
  • You can also add variables 
After filling all the settings, the box Then and Else has to be filled with other nodes.

16.6.2 Send Email

The nodes “Send Email” is used to send email notification when the chosen trigger happens.

To put it in the workflow, click on the box shown below

After choosing the node, this page will open. 

Fill all the settings and Add Variables if this is needed. 

When this is done, click on validate and the nodes will be created. 

16.6.3 Get User

To create an action to get user, use the node “Get User” click on the box as shown below:

After that, this page will open: 

Fill all the settings and add the necessary variables in the “Find Value” box.

Click on validate when this is done.

16.6.4 Assign Role to user

To add in the workflow the actions of assigning a role to a user, click on the node ” Assign Role to User” as shown below:

After that, this page will open, 

  • You have to enter the role’s number of identification 
  • You Also have to fill enter the user’s number of identification of the user who’s the role will be applied

After filling all the settings, click on validate to create the node.

16.6.5 User Approval

To create the action of a user approval, click on the node “User Approval” as shown below:

After that, this page will open:

  • You have to fill all the settings, fill the user id with the chosen variable. 
  • In the box “Is approved” you have to choose between true or false. 
  • After that, click on validate to create the node


16.6.6 User Locking

To create the action of a user locking, click on the node “User locking” as shown below:

After that, this page will open

  • You have to fill all the settings, fill the user id with the chosen variable.
  • In the box “Is approved” you have to choose between true or false.
  • After that, click on validate to create the node

16.6.7 Must change password at next logon

To add the action in the workflow of changing the password after the log on of a user, click on the node ” Must change password at next logon” as shown below

After that, this page will open:

Fill all the settings and enter the type of user ID in using the variables needed. Exemple: Manager.

After that, click on validate to create the node.

16.6.8 Activation uri

To create the action of the activation of an uri”, click on the node “Activation uri” as shown below:

And this page will open:

  • You have to fill all the settings, fill the user id with the chosen variable.
  • Choose all the variables for parameter, Expiry & Call uri.
  • After that, click on validate to create the node.

16.6.9 Call uri

To create the action of the call of an uri”, click on the node “call uri” as shown below:

And this page will open:

You have to fill all the settings, fill the user id with the chosen variable.
After that, click on validate to create the node.

16.6.10 Generate documentation

To add the action in the workflow of generating a documentation click on the box “generate documentation”:

After that, this page will open:

Fill all the settings needed and chose the right variable for the entity identification. 

After that, click on validate to create the node. 

16.6.11 Generate permission matrix

To create the action of generating a permission matrix in the workflow, click on the box ” Generate permission matrix” as shown below:

After that, this page will open : 

Fill all the settings needed and chose the right variable for the entity identification. 

After that, click on validate to create the node. 

16.7 Globale variables

The globale variables all the variable than are not already registered in the VG system.

  • They can be created, modify and removed.
  • To create a new globale variable, click on “create Variable” in the right corner of the page.

To create a variable, all the settings below needs to be filled: 

  • The name in mandatory, put it in the box “Name”
  • Choose the type of the variable, it can be :
    • Boolean
    • Int32
    • String
    • DateTime
    • Email
  • Fill the description box
  • Enter the value. Exemple for email: put the email adresse. 
  • If the globale variable needs to be removed just click on remove.
  • After finishing, click on update to update and refresh the page.


16.8 Event viewer

This page allows you to audit all the event concerning a workflow that has happened on the console.

  • All the actions done have been reported in this page. The description of the action is shown under “title” (A) and with the date and time of it (B)
  • The user name of the person who did the action is written next to the title. 
  • The Event ID is also detailed with the device number. 

By clicking on the blue “I” on the left of the date and time, informations of the workflow and the action will open: 

  • A time slot can be defined in order to find easily the event: 

16.9 Settings

The Workflow is a system meant to personalized notifications or actions in the Visual Guard Webconsole.

  • You can chose to activate the workflow server (the notifications) by clicking on “Workflow server” (A)
  • You can see who executes the workflow 
  • Test can be done to see if the email notifications is working by filling the “SMTP test” part (B)

How to connect to Office 365

The user needs to have the rights to send emails by Office 365

Connect to Office 365 portal (https://portal.office.com/adminportal)

Go to active user and select your user

Click on “Manage email apps”

Check the option “Authenticated SMTP”

The username needs to be use for the email FROM

17. Settings

The Visual Guard Webconsole settings are divided in three sections:

  • Global MFA Policy
  • User interface
  • License

The pages are available at the end of the left navigation panel.

To know more about it, follow the pages below:

17.1 Global MFA Policy

What is a Global MFA Policy? A Global MFA Policy in Visual Guard is a centralized set of rules and settings that define how MFA is applied across all applications and users within an organization.

You can go to setting –> Global MFA Policy and setup up your rules.

  • Select the type of method you are opting for the security.
    • OTP via email or phone
    • Secure link via email or phone
  • The number of Grace logins (allows users a limited number of logins, or a period of time, to access a system without completing the usual authentication requirements) you would like to provide.
  • Provide the enrollment URL
  • Provide the setting required.
    • Scope: choose where you want the setting to reflect either under the whole Repository or specific Application
    • Duration: You can mention the time till when you want this feature to be active till

17.2 User interface

The Workflow is a system meant to personalized notifications or actions in the Visual Guard Webconsole.

The setting section of the Workflow includes two differents part:

  • License 
  • User interface

The page user interface is divided in 3 sections: 

  • Company logo 
  • Theme
  • Login Page text 

Company logo 

The company logo can be downloaded from this page by clicking on the folder icon as shown below (A) :

All the informations are detailed above it.

Theme

The color theme of the websites can be picked on the theme page. You can select 3 different theme (A). 

The UI settings are juste above the themes and you can check or uncheck them (B).

Login page texte

The Login page can be personalized via this page. 

  • The tool bar has all the options and tools needed (A) 
  • The text will be posted on the page (B) . 

17.3 License Key

Please follow the below steps to request for a license key in Visual Guard WinConsole.

  • Step 1: Login to a repository

  • Step 2: Go to Settings –> License –> Request License key

  • Step 3: Fill in the required details.

  • Step 4: After submitting your request, the support team will begin processing your key. You’ll be notified via email as soon as it’s generated.

18. Advanced

18.1 Permission Matrix

The Visual Guard WebConsole allows you to generate a permission matrix for roles, groups, or users. 

  • To generate it, click on the chosen role, user or group.
  • Then go to the top-right corner menu and click on “Generate Permission Matrix” (A). 
  • A new page opens. Select the information that will appear in the Permission Matrix. 
  • When you have selected the desired parameters, click “OK” to generate the matrix or “Cancel” to return to the previous screen.
  • The matrix will be downloaded on your computer. 

See also:

18.2 Audit permissions

Visual Guard allows to grant an infinite number of permissions for different types of entities: users, groups or roles.

This page explains how to investigate the permissions granted to a certain role (A).

  • Click on the role or user or group you want to audit
  • Then go on “Audit permissions” to see what permissions are granted
  • For an application, go on the permission page and all the permissions granted to this application will be shown as below

See also: 

18.3 Permission coming from

Visual Guard allows to grant an infinite number of different permissions for different types of subgroups.

  • When you Audit the permissions of a user or a group (role/ permission set), you can seek from where the permissions has been given by clicking on the icon under the « coming from » title (A).
  • After clicking on coming from, a page will open with the details of the permissions. 

See also: 

19. Archive

19.1 VG 2020.X

19.1.1 Installation Setup

System Requirements

  • Operating System: Windows Server 2012, 2016, 2019, 2022
  • Hard Drive: A minimum of 512 GB, up to 1 TB. A fast drive is recommended, ideally an SSD.
  • CPU: Minimum of 4 cores, operating at 3 GHz or higher.
  • RAM: At least 8 GB.
  • Software: .Net Core 3.1, a web browser with JavaScript support.
  • Database: SQL Server for the Visual Guard Repository (Standard Edition or higher), or Oracle for the Visual Guard Repository (Oracle Driver installation required).

  1. Install Internet Information Services (IIS): IIS is a web server software package designed for Windows. It’s used for hosting websites and other content on the web. You can install it through the “Turn Windows features on or off” menu in the Control Panel.
  2. Download and Install .NET Core Hosting Bundle: The hosting bundle includes the .NET Core Runtime, .NET Core Library, and the ASP.NET Core Module. The ASP.NET Core Module is a necessary component for hosting ASP.NET Core applications on IIS. You can download the hosting bundle from the official Microsoft website.
  3. Restart IIS: After installing the .NET Core Hosting Bundle, you should restart the IIS to ensure the changes take effect. You can do this by opening a command prompt as an administrator and running the command iisreset.
  4. Install .NET Core SDK 3.1: The SDK is necessary for developing .NET Core applications. You can download it from the official Microsoft website.
  5. Verify the Installation: You can verify that .NET Core SDK and ASP.NET Core Runtime are correctly installed by opening a command prompt and running the following commands:
    • For .NET Core SDK: dotnet --version
    • For ASP.NET Core Runtime: dotnet --list-runtimes
    These commands should display the versions of .NET Core SDK and ASP.NET Core Runtime that are installed on your machine.
  6. Install Visual-Guard WebConsole: Once IIS, .NET Core SDK, and ASP.NET Core Runtime are installed, you can proceed with the installation of Visual-Guard WebConsole. Follow the instructions provided by Visual-Guard for this process.

Installation Guide

The Visual Guard WebConsole needs to be installed on your server. Follow these steps for a successful installation:

  1. License Agreement: Accept the license agreement to proceed with the installation.
  2. Installation Details: Provide the necessary information, including:
    • The site
    • The virtual directory
    • The application pool
    Click ‘Next’ to continue with the installation.
  3. Confirmation: Confirm to initiate the installation of the console on your server.
  4. Installation Process: Please be patient while the installation process is underway.

Installation

The Visual Guard WebConsole needs to be installed on your server. Follow these steps for a successful installation:

  • License Agreement: Accept the license agreement to proceed with the installation.

Installation Details: Provide the necessary information, including:

  • The site
  • The virtual directory
  • The application pool

Click ‘Next’ to continue with the installation.

Confirmation: Confirm to initiate the installation of the console on your server.

Installation Process: Please be patient while the installation process is underway.