Introduction
Installation Guide
System requirements
Hardware Reqiurements
- Operating System: Windows Server 2012, 2016, 2019,2022 or Windows 10, 11
- Hard Drive: 512 GB to 1 TB Fast drive recommended – ideally SSD
- CPU: Minimum of 4 cores, operating at 3 GHz or higher.
- RAM: 8 GB
Network Prerequisites
- Required Allow-Listing (Domain)
- Identity Server domain
- If you use MFA (Multifactor Authentication) – https://mfa.visual-guard.com/
- Protocol & Ports : HTTPS/TLS over TCP port 443 (outbound) – Incase you use a customised port then ensure to whitelist that port number. This helps in communicating to any VG component or your business application.
- DNS Resolution: All servers should be able to resolve each other via the hostname and Fully Qualified Domain Name (FQDN)
- Latency & Performance: Ensure low network latency between application and repository.
- Proxy / VPN Considerations
- If a proxy is used then configure exceptions for Visual Guard services
- If VPN is used then ensure stable and uninterrupted connection and verify routing allows access to repository/database
- Testing Connectivity: Before deployment, validate:
- Database connectivity from application server
- API/service accessibility
- Port availability (telnet / test tools)
- Access to Active Directory or Microsoft Entra: Ensure that the Active Directory or Microsoft Entra access is available to the administrator account, as this enables Visual Guard to perform authentication and synchronization processes successfully.
Software Requirements
- Software:
- VGRepository
- Require SQL Server 2012 or later, with a minimum of the Standard Edition.
- Require Oracle Database with Oracle9i or later. Please ensure the Oracle Driver is installed.
Installation
Visual Guard uses the industry standard InstallShield as the installation mechanism. The installation is almost entirely automated and should just take a few minutes to complete.
To install Visual Guard, follow the steps below:
Note: You can cancel the installation at any time
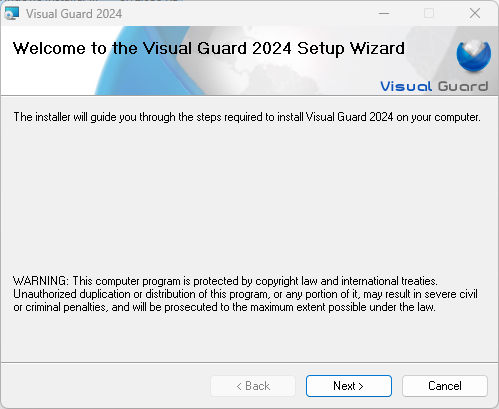
- Step 1:Double-click on the installation file icon. The screen below will be displayed.
- Click “Next “ to continue with the installation.
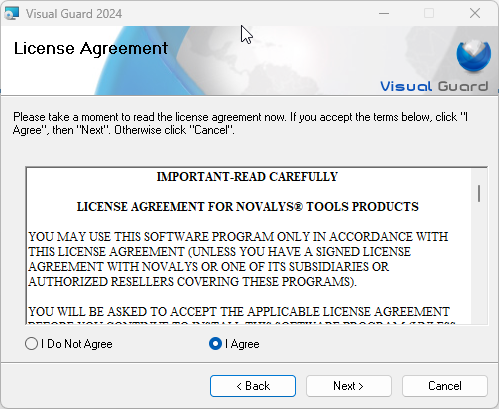
- Step 2: License Agreement: On selecting I Agree option, “Next “ will be enabled as shown below
- Click “Next “ to proceed with the installation.
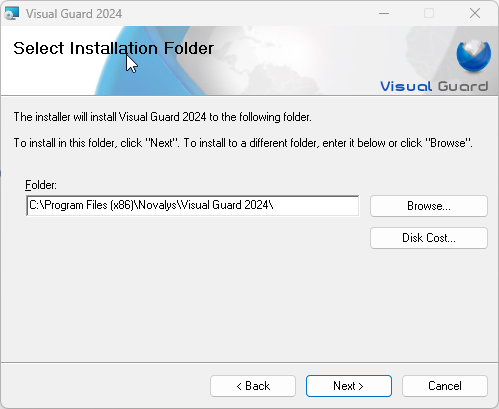
- Step 3: Select the location to install Visual Guard by clicking “Browse”.
- The selected location will be displayed in the Folder (A).
- You can click “Disk cost” to see the availability and required space for installation.
- Click “Next >” to proceed with the installation.
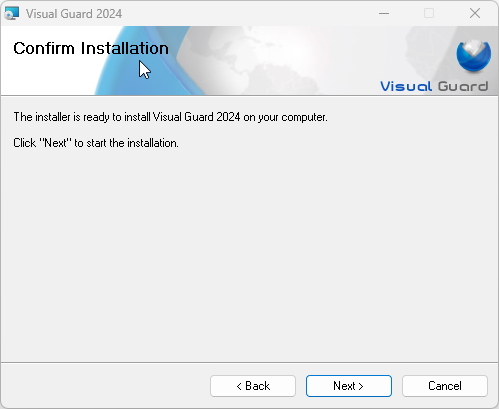
- Step 4: Click “Next >” to start the installation or click “< Back” to make any changes.
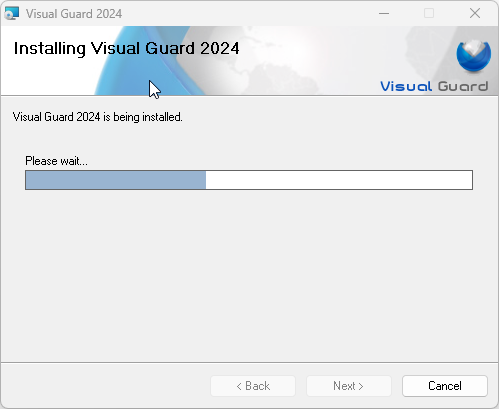
- Step 5: On clicking “Next >” , the installation process will start as shown below.
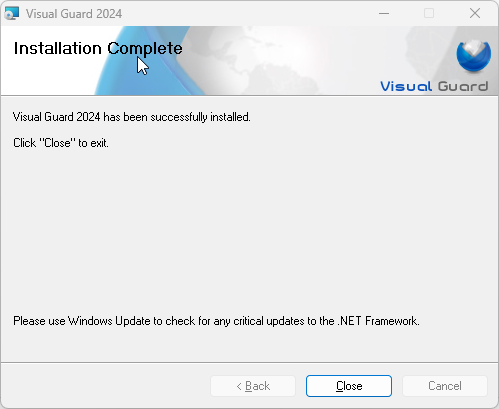
- Step 6: Once the installation is complete, the screen below will be displayed.
- Click “Close” to exit the installation.