


Microsoft Entra ID (formely Azure Active Directory)
In Visual Guard, Microsoft Entra ID represents the integration with Microsoft’s Azure Active Directory (Azure AD) under the new branding of Microsoft Entra ID.
Key Benefits of Microsoft Entra ID in Visual Guard:
- Centralized Identity Management: Manage user identities and access from a central Microsoft Entra ID, simplifying the administration of users across multiple applications.
- Multi-Factor Authentication (MFA): Leverage Visual Guard’s MFA capabilities to enhance security for user logins, ensuring secure access to Visual Guard-protected resources.
- Conditional Access Policies: Administrators can configure conditional access policies based on location, device, or risk level to secure access to Visual Guard applications.
How to Register your application to Azure
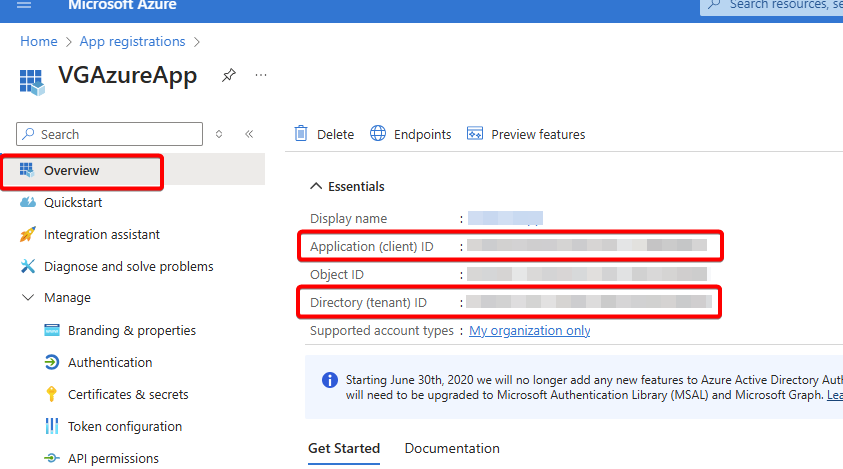
Step 1: Go to App Registrations –> Register your application by filling in the required details.

Step 2: You will be able to view application details once created under the overview section.
Connection Types
When adding Microsoft Entra ID domain, you can choose between two connection types: Client Secret and User Credentials (ROPC). The Client Secret method uses the secret value generated for a registered Microsoft Entra ID application to authenticate Visual Guard securely. Alternatively, the User Credentials (ROPC) method authenticates using the credentials of a Microsoft Entra ID user account.
Select the connection type that best suits your organization’s security and integration requirements.
- Connecting by User Credential(ROPC)
- Connecting by Client Secret
The User Credentials (ROPC) connection method uses the credentials of a Microsoft Entra ID user account to authenticate with Microsoft Entra ID. This method allows Visual Guard to perform directory operations on behalf of the authenticated user and requires a valid username and password.
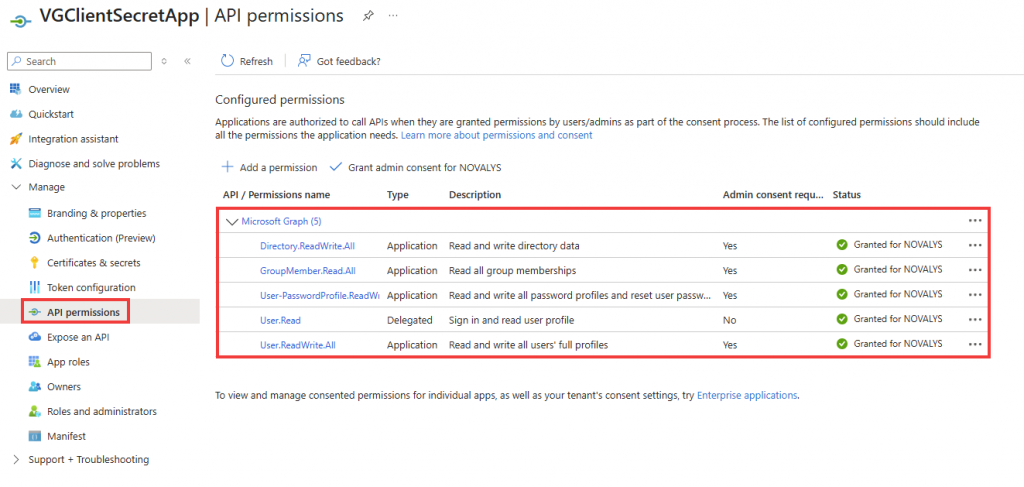
Step 1: API Permissions:
The below list of configured permissions should include all the permissions the application needs. Applications are authorised to call APIs when they are granted permissions by user/admins as part of the consent process.
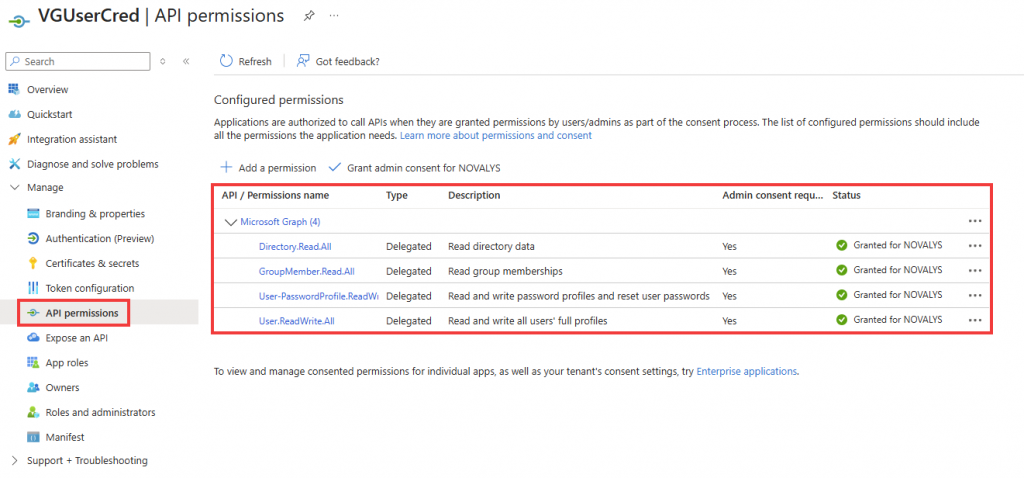
List of the configured permissions, for more details on each permission click on the permission.
| API/Permissions Name | Type | Descritpion | Admin Consent Request |
|---|---|---|---|
| Director.Read.All | Delegated | Read directory data | Yes |
| GroupMember.Read.All | Delegated | Read group memberships | Yes |
| User-PasswordProfile.ReadWrite | Delegated | Read and write password profiles and reset user passwords | Yes |
| User.ReadWrite.All | Delegated | Read and write all user’s full profiles | Yes |
Step 2: Authentication
Ensure that under advanced settings you enable the mobile and desktop flows to Yes.

How to add Azure Entra in Visual Guard
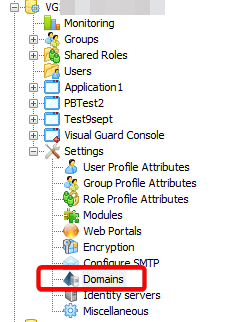
Step 1: Login to the repository –> Go to Settings –> Click on Domains

Step 2: Click on Add Domain

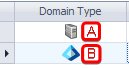
- A – Active Directory
- B – Microsoft Entra ID
Step 3: Select Entra ID from the drop down list under Domain Type –> Select UserCredentials under the Connection type.
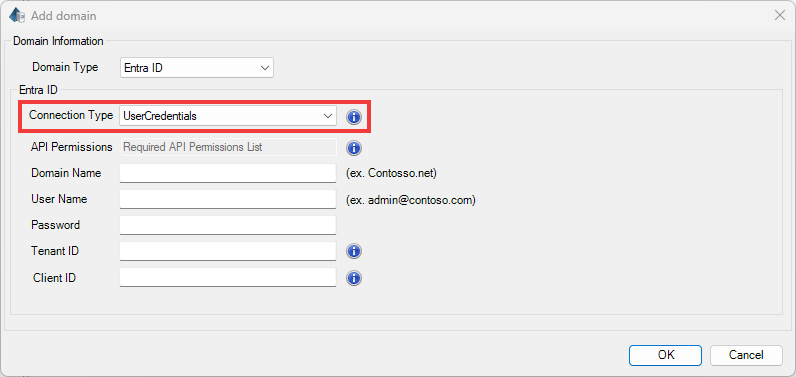
- Domain Type: Specifies the type of domain, local active directory or Microsoft Entra Id.
- Connection Type: Select the connection method to connect to Microsoft Entra ID. Choose User Credentials.
- API Permissions: Displays the list of Microsoft Graph API permissions required for the selected connection type. Ensure these permissions are granted in the registered Entra application.
- Domain Name: The unique name that identifies a domain within a network, often used to specify the location of a service or resource, like
example.com. - Username: A unique identifier used by a user to log into a system or service, often paired with a password.
- Password: A secure string of characters used in combination with a username to authenticate a user’s identity.
- Tenant ID: A unique identifier for a tenant, or organization, in a multi-tenant cloud environment like Azure, used to segregate resources and user directories.
- Client ID: An identifier for an application within a service or platform (like Azure AD), used to authenticate and authorize the app during API calls.
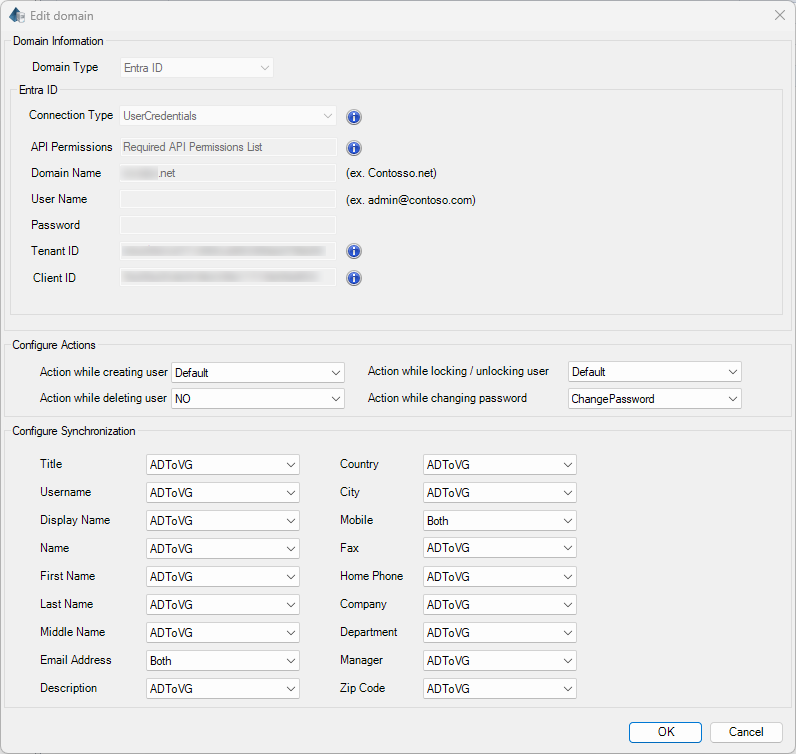
Step 4: You can click on the Edit icon to set the additional settings.

There are 4 sections in the edit section that helps you to configure any actions for your ease.
- Domain Information: This includes user related information, domain type.
- Entra ID: The User Credentials connection type authenticates Visual Guard using a Microsoft Entra user account. Provide the required user credentials along with the tenant and client information to enable secure communication with Microsoft Entra ID
- Configure Actions: Defines specific tasks or permissions that users or groups can perform within the domain in Visual Guard, ensuring the right access and capabilities are granted for various operations.
- Configure Synchronization: Sets up rules and schedules for synchronizing user and group data between Visual Guard and external directories or systems, maintaining consistency and up-to-date access rights across platforms.
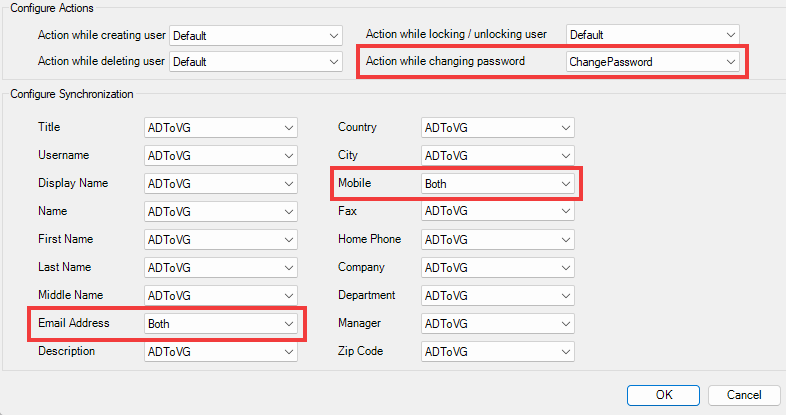
Note: If you want to synchronize Active Directory (AD) with Visual Guard (VG), you can configure the synchronization according to your preferred settings. Below are a few common examples:
- In the “Configure Actions” settings, the option for “Action while changing password” can be set to ChangePassword. This ensures that when a user is created in Azure, they are prompted to change their password upon their first login in the WinConsole. Additionally, to enable password changes for Azure users from the UserDetails section, this option can be set to ChangePassword.
- In the “Configure Synchronization” settings, both Mobile and EmailAddress can be set to Both. During MFA enrollment, if the Mobile and EmailAddress fields in Active Directory are empty, they will be populated with the values entered during enrollment. If these fields already contain values in Active Directory, those existing values will be displayed during MFA enrollment.
Once you edit your settings and click OK, you will get a notification as shown below to restart winconsole.

The Client Secret connection method uses the secret value generated for the registered Microsoft Entra application. This secret is used by Visual Guard to authenticate as the registered application when communicating with Microsoft Entra ID. Since it provides access to the application, the client secret should be stored and shared securely.
Step 1: API Permissions:
The below list of configured permissions should include all the permissions the application needs. Applications are authorised to call APIs when they are granted permissions by user/admins as part of the consent process.
List of the configured permissions, for more details on each permission click on the permission.
| API/Permissions Name | Type | Descritpion | Admin Consent Request |
|---|---|---|---|
| Director.ReadWrite.All | Application | Read and write directory data | Yes |
| GroupMember.Read.All | Application | Read all group memberships | Yes |
| User-PasswordProfile.ReadWrite | Application | Read and write all password profiles and reset user password | Yes |
| User.Read | Delegated | Sign in and read user profile | No |
| User.ReadWrite.All | Application | Read and write all user’s full profiles | Yes |
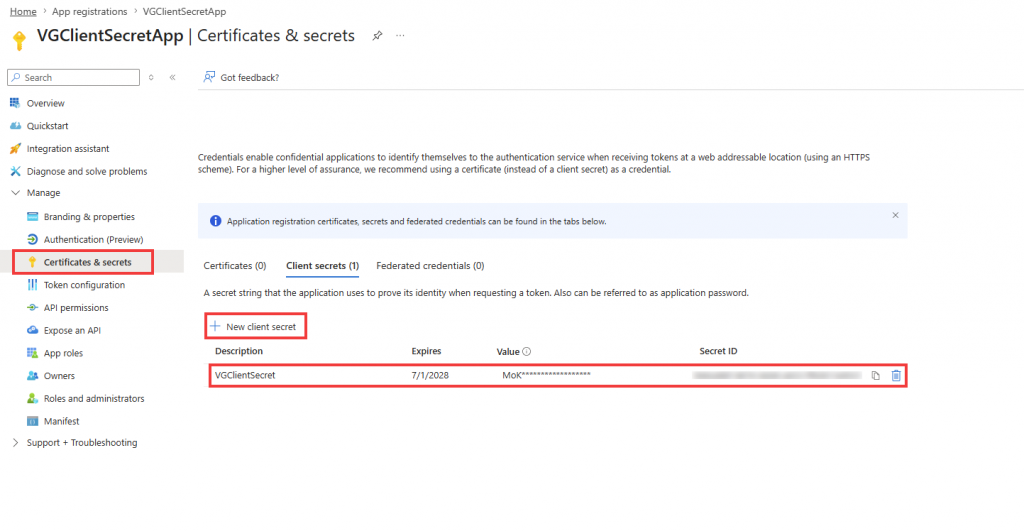
Step 2: Generate the Client Secret Key:
Generate the client secret key by going to the Certificates & Secrets section. Click on the + New Client Secret and a new key will be generated as shown below.
How to add Azure Entra in Visual Guard
Step 1: Login to the repository –> Go to Settings –> Click on Domains
Step 2: Click on Add Domain
- A – Active Directory
- B – Microsoft Entra ID
Step 3: Select Entra ID from the drop down list under Domain Type –> Select UserCredentials under the Connection type.
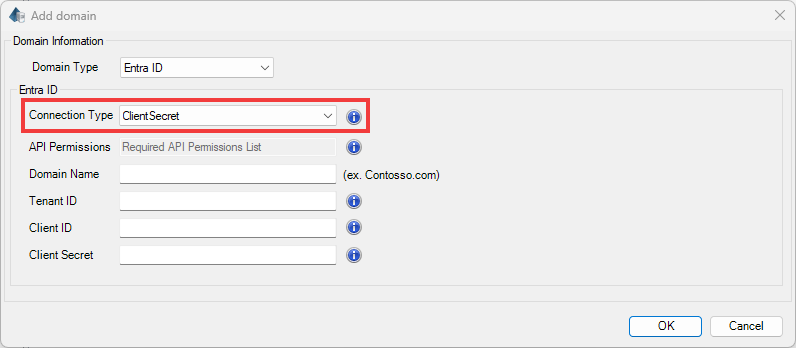
- Domain Type: Specifies the type of domain, local active directory or Microsoft Entra Id.
- Connection Type: Select the authentication method to connect to Microsoft Entra ID. Choose Client Secret.
- API Permissions: Displays the list of Microsoft Graph API permissions required for the selected connection type. Ensure these permissions are granted in the registered Entra application.
- Domain Name: The unique name that identifies a domain within a network, often used to specify the location of a service or resource, like
example.com. - Tenant ID: A unique identifier for a tenant, or organization, in a multi-tenant cloud environment like Azure, used to segregate resources and user directories.
- Client ID: An identifier for an application within a service or platform (like Azure AD), used to authenticate and authorize the app during API calls.
- Client Secret: Enter the client secret generated for the registered Microsoft Entra application. This secret is used by Visual Guard to authenticate with Microsoft Entra ID and should be stored securely.
You can find the Tenant ID, Client ID & Client Secret from the Azure Portal –> Home –> App Registrations –> Select your application –> Overview. (step 5 above)
Note: If an invalid domain name is entered, an error message will be displayed prompting you to enter a valid domain name.

You can click on the Edit icon to set the additional settings.
There are 4 sections in the edit section that helps you to configure any actions for your ease.
- Domain Information: This includes user related information, domain type.
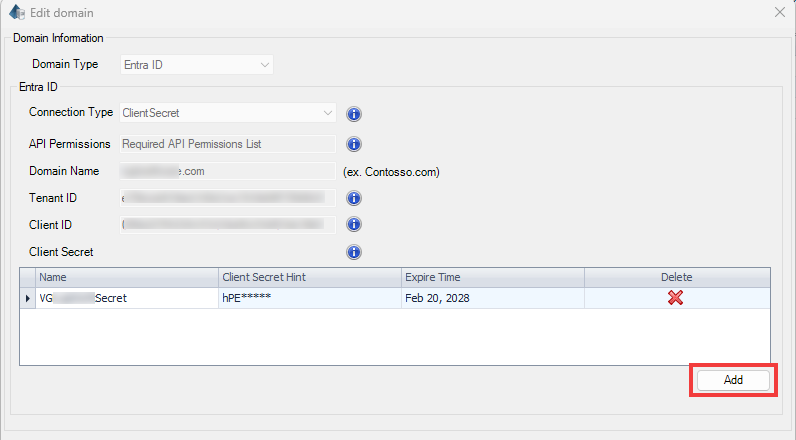
- Entra ID: The Client Secret section displays the client secrets configured for the registered Microsoft Entra application. It shows the secret name, a masked hint, the expiration date, and provides options to add or delete client secrets as needed.
- Configure Actions: Defines specific tasks or permissions that users or groups can perform within the domain in Visual Guard, ensuring the right access and capabilities are granted for various operations.
- Configure Synchronization: Sets up rules and schedules for synchronizing user and group data between Visual Guard and external directories or systems, maintaining consistency and up-to-date access rights across platforms.
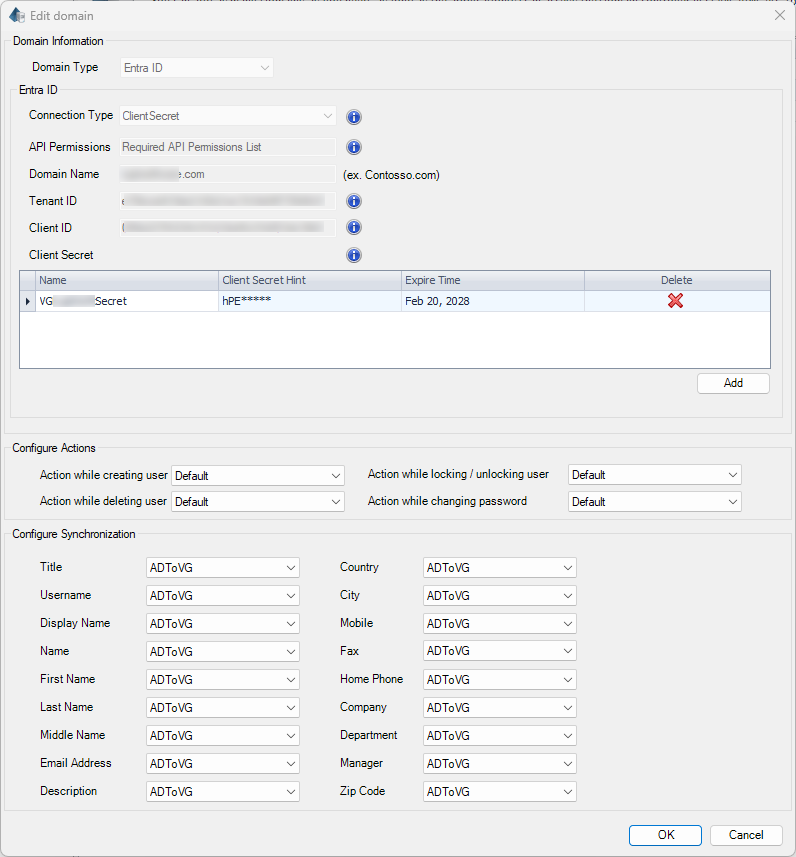
You can add a new Client Secret key by clicking on the Add button. Please note that Visual Guard automatically uses the Client Secret key with the furthest expiration date. You can also Delete old keys that are not in use to avoid any confusions by clicking on the X cross icon next the to key
Warning: It is recommended to create a new Client Secret key well before the current key expires. If the active Client Secret key expires without a replacement in place, the authentication process will be interrupted, preventing users from authenticating until a valid key is configured.
Note: If you want to synchronize Active Directory (AD) with Visual Guard (VG), you can configure the synchronization according to your preferred settings. Below are a few common examples:
- In the “Configure Actions” settings, the option for “Action while changing password” can be set to ChangePassword. This ensures that when a user is created in Azure, they are prompted to change their password upon their first login in the WinConsole. Additionally, to enable password changes for Azure users from the UserDetails section, this option can be set to ChangePassword.
- In the “Configure Synchronization” settings, both Mobile and EmailAddress can be set to Both. During MFA enrollment, if the Mobile and EmailAddress fields in Active Directory are empty, they will be populated with the values entered during enrollment. If these fields already contain values in Active Directory, those existing values will be displayed during MFA enrollment.
Once you edit your settings and click OK, you will get a notification as shown below to restart winconsole.